 ®
®
Training
Manual


Welcome to Epitomax…..
Your Behavioral Health web-based system that integrates Patient Tracking, Scheduling, Service Activity, Billing, Clinical, and Accounts Receivable. This document includes a table of contents, step-by-step processes on how to perform functional activities, end of lesson exercises and graphic screenshots illustrating program activities, notes, tips, and special conditions. This document is meant to assist you in your use of Epitomax.


Table Of Contents
Lesson
1 Getting Started With Epitomax
Using
Epitomax Buttons & Links
Important
Notes Regarding System Usage
Access
Center Request Waiting List
Lesson
6 Utilization Management
Accessing
Utilization Management Records
|
|
Lesson 1
|

|
Using The Courseware |
The following terms are used in the courseware to provide supplemental information
|
|
Presents additional information about a topic |
|
Tip |
Presents a shortcut way of performing a function |
|
|
Using The Mouse |
The following terms are used to describe functions performed with the mouse
|
Click |
Press and release the left mouse button |
|
Double-Click |
Click the left mouse button twice quickly |
|
Right-Click |
Press and release the right mouse button |
|
Drag |
Move the mouse while holding down the left mouse button |
|
Highlight |
Drag the mouse pointer across data, causing the information to appear selected |
|
Point |
Position the mouse pointer on the indicated icon |
|
|
Using Epitomax Buttons & Links |
The following describes buttons used to perform functions in Epitomax
|
|
Logs Into Epitomax |
|
|
First page |
|
|
Previous Page |
|
|
Next Page |
|
|
Last Page |
|
|
Searches For Specified Data |
|
|
Clears Data |
|
|
Provides Help On Current Topic |
|
|
Adds New Data |
|
|
Updates Existing Data |
|
|
Displays More Information |
|
|
Confirms A Selection |
|
|
Submits The Entered Criteria |
|
|
Deselects A Selected Choice |
|
|
Cancels The Function |
|
|
Deletes A Selected Option |
|
|
Goes Back To The Previous Screen |
|
|
Closes A Window |
|
|
Presents A Search Box To Select Choices From – used typically when there are over 100 entries from which to choose |
|
|
|
|
|
Activates/Deactivates A Selection |
|
Selects A Condition or acts as a Filter for Information |
Edit
|
Makes Changes To Existing Data |
Delete
|
Deletes Data |
Logout
|
Logs Out Of Epitomax |
Tabs
|
Allows Navigation Through Epitomax |
|
|
Epitomax File Formats |
The following describes formats in which results in Epitomax can be viewed
MS-Excel
|
Views A Page in Microsoft Excel |
|
Text |
Views A Page In Notepad |
|
HTML |
|
|
Acrobat PDF |
Views A Page In Adobe Acrobat |
* Browser – The application the Epitomax Program operates in
|
|
Epitomax Special Entries |
The following describes the ways Birth Dates, Payors and Social Security Numbers need to be entered in Epitomax
|
Birth Dates |
If a patient does not have a birth date, enter “1’s” (11/11/1111) |
|
Payors |
If a patient no longer uses a Payor, enter the Payor Rank as “99” |
|
Time |
Epitomax uses a 24-hour clock. For example, 3:00 in the afternoon could be entered as 15 versus 3:00 pm. Or 8:00 am can be entered as 8. |
|
Searching… |
Entering the “%” before letters in a search window will search for any entry that contains those letters |
|
|
Important Notes Regarding System Usage |
! Some functions in Epitomax can only be performed by staff with proper security permissions. If you need assistance, please contact the Help desk or your supervisor.
! Please enter as much information as possible to ensure the integrity of the database.
! Some buttons and links are not operational in this version of Epitomax.
! Use sentence structure when entering data instead of all upper or lower case.
! Use the tab key on the keyboard or use the mouse, to move from one field to another instead of the enter key.
! If you make changes and then decide to advance to another function without updating your changes, the following message will be displayed:

If you choose to click OK, your changes will not be recorded.
! Some fields in Epitomax are required. This means
data has to be entered in the field.
Typically you will find these required fields highlighted in light blue.
! Should menu selections need to be added, please contact the Help desk or your supervisor.
! The exercises in this manual are only to be executed in the Epitomax “Sandbox” not in the “live” database.

To access Epitomax a user will need to login.
To login
The Login function allows users to Login to the Epitomax system.
1. Double-Click
the Epitomax ![]() icon on the desktop
icon on the desktop
Alert: If there is no Epitomax Icon on your desktop, please do the following:
·
Double-Click the Internet Explorer
![]() Icon on the desktop
Icon on the desktop
· Type the Epitomax URL (Uniform Resource Locator) in the Internet Explorer Browser Address field

·
Press the Enter key on the Keyboard
![]() The Epitomax login screen displays
The Epitomax login screen displays
2. Click
in the User Name field
3. Type your Epitomax Login (Use your “training#” during training class)
4. Click in the Password field
5. Type your Epitomax Password (Use your “training#” during training
class)
6. Click Login
Alert: Your normal Epitomax Username And Password Will Be Used To Login Outside Of Training.
To Expand/Collapse Epitomax menus
Epitomax uses Expandable and Collapsible menus to display and hide Program functions.
- Click Patient Tracking (The window expands)
- Click Patient Tracking (The window collapses)
- Click Service Activity
- Click Scheduling
Logging Out
The Logout function allows users to Logout of the Epitomax system.
To logout
1. Click the Logout link in the upper right corner
![]()
2. Close Internet Explorer
|
Lesson 2
|
|
|
Getting Help |
To get Help using the Help button
The ![]() button allows users to receive Help on the
current topic.
button allows users to receive Help on the
current topic.
![]() Help
Topics may not be available for all functions
Help
Topics may not be available for all functions
To get Help using the Help Link
To get Help using contents
The Help Contents function allows users to receive Help by searching through a list of categories.
To get Help on how to create an Alternate Contact, do the following:
1. Click on the Help link in the upper right corner
![]() The
Epitomax Help screen appears
The
Epitomax Help screen appears
2. Click the Contents tab (The system defaults to the contents tab)
3. Click Patient Tracking
4. Click Client Search (The Help topic for Client Search is displayed)
5. Click Episodes
6. Click Create Alternate Contacts (The Help topic for Alternate Contacts is displayed)
7. Click Episodes (Notice the category collapses)
8. Click Patient Tracking to close the book
9. Click Scheduling
10. Click Accounts Receivables
11. Collapse all open books
To get Help using index
The Help Index function allows users to receive Help by typing in key words.
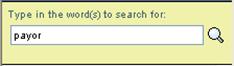
To get Help on how to add a Payor, do the following:
1. Click the Index tab
2. Type Payor in the Keyword text box
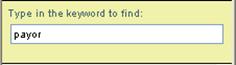
3. Tap the Enter Key on the Keyboard
4. Select Adding A Payor from the Shortcut Menu to display the Help topic for adding a Payor
Tip: Clicking on the keyword will
bring up the shortcut menu with associated Help topics
To get Help using search
The Help Search function allows users to receive Help by typing in key words.
To get Help on how to add a Payor, do the following:
1.
Click Search
2. Type Payor in the Keyword text box
3. Tap the Enter Key on the Keyboard (All results containing “Payor” are displayed)
4. Click Create Authorization Requirement (Note “Payor” in the Help detail)
5. Close the Help Browser window
|
Lesson 3
|
|
Client Search |
To perform a Client Search
The Client Search function allows users to locate patients that exist within the database. This function is vital in verifying whether or not the Client Record exists and should be the first step in many of your processes.
1. Login to Epitomax:
|
Username |
“training#” |
|
Password |
“training#” |
2. Click the Patient Tracking main menu item
![]() Choices
listed under the main headings on Epitomax’s Main Menu change depending
on what screen is active.
Choices
listed under the main headings on Epitomax’s Main Menu change depending
on what screen is active.
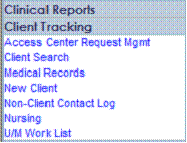
3. Click on Client Search to begin the search for a specific patient.
![]()
The Clear button Clears the Search Criteria.
Tip: Using the % and the letter,
will bring up all results containing that letter(s)
For example: typing in %b will bring up Baker, Barbara, Farber. This feature can be used for all search functions.
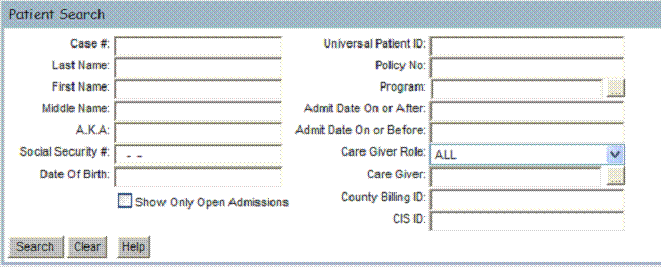
![]() Searches
can be performed using any of the above fields.
Searches
can be performed using any of the above fields.
![]() All the fields displayed are free text entry
and there are no required fields but criteria must be entered in a least
one field to begin a patient search.
All the fields displayed are free text entry
and there are no required fields but criteria must be entered in a least
one field to begin a patient search.
![]() It is recommended that a Client Search be
performed by first entering a portion of the patient’s Last Name, Birth Date or
Social Security Number.
It is recommended that a Client Search be
performed by first entering a portion of the patient’s Last Name, Birth Date or
Social Security Number.
![]() The more information provided, the less likely
a New Client Record will be a duplicate.
The more information provided, the less likely
a New Client Record will be a duplicate.
![]() The “Show Only Open Admissions” checkbox narrows
down the Client Search to include only those patients with Open Admissions.
The “Show Only Open Admissions” checkbox narrows
down the Client Search to include only those patients with Open Admissions.
![]() To enter a date, user must enter slash
marks (**/**/**).
To enter a date, user must enter slash
marks (**/**/**).
![]() Epitomax remembers the last criteria entered.
Epitomax remembers the last criteria entered.
![]() If search results are over 100, no results are
displayed. Include more criteria to narrow results.
If search results are over 100, no results are
displayed. Include more criteria to narrow results.
4. Click Clear
5. Type “A” in the First Name field
6.
Click ![]()
Alert: No Results Are Displayed Because There Are Over 100 Patients With First Names Beginning With “A”.

7. Click Clear
8. Type Abrams in the Last Name field
9.
Click ![]()
![]() The Search Results screen is displayed
The Search Results screen is displayed

![]() If the patient is not in the Search
Results list, then either the Client Record does not match the criteria given
or the patient is not in the system. The search criteria may need to be
modified, either by adding more complete information or entering only a portion
of the Patient’s Name, Social Security #, etc., and executing the search again.
After these steps have been completed, and the patient is still not displayed,
a new Client Record may need to be created.
If the patient is not in the Search
Results list, then either the Client Record does not match the criteria given
or the patient is not in the system. The search criteria may need to be
modified, either by adding more complete information or entering only a portion
of the Patient’s Name, Social Security #, etc., and executing the search again.
After these steps have been completed, and the patient is still not displayed,
a new Client Record may need to be created.
![]() Entering accurate information and
executing additional searches will help to prevent duplicate Client Record
entries.
Entering accurate information and
executing additional searches will help to prevent duplicate Client Record
entries.
10. Click
![]() to display more demographic information about
the patients listed in the search results
to display more demographic information about
the patients listed in the search results
11. Click Contract to collapse demographic information about the patient
12. Click Clear
13. Type Duck in the Last Name field
14. Click Case #: 1000 to display the Client Record for Duck, Daffy
15. Click
![]() on the Alert message box
on the Alert message box
16. Click Alerts to view, add or edit a patient’s Alerts
17. Click
![]() (Note: Help is displayed for viewing Alerts in
a new browser window)
(Note: Help is displayed for viewing Alerts in
a new browser window)
18. Click Payor Information to view, add or edit patient Payor Information
19. Click Episode History to view, add or edit a patient’s Episode History
20. Click on Allergies which, when you click Add, will take you directly to DrFirst in order to enter any allergies for the patient
21. Click Medications to view, add or edit a patient’s Medication History via the ePrescribe button, which will redirect you to DrFirst
22. Click Documents to view or add documents to a patient’s chart, such as an insurance card or information from the referral source
23. Click Appointments to view, reschedule or insert a new appointment for the patient
|
|
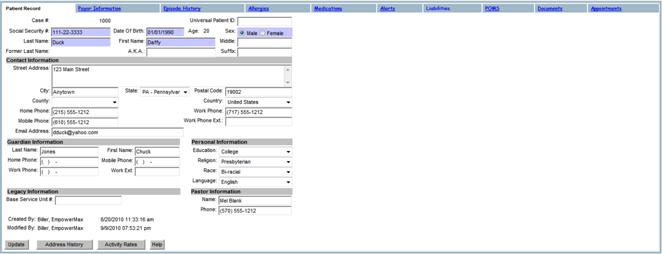
Client Records |

The Client Record contains the patient’s Demographics, Contact Information, Guardian Information, Legacy Information and the Address History. Additional tabs display the Payor Information, Episode History, Allergies and Medications via DrFirst, any Alerts for the patient, any documents that have been scanned into Epitomax and Scheduled Appointments.
To create a new Client Record
The Create Client Record function allows users to create a New Client in the database.
A New Client Record should be created only after a thorough Client Search in the system has been completed, and the client was not found in the Search Results.
1. Click on the New Client link on the main menu from the Client Tracking option
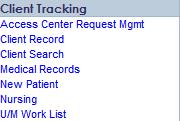
![]() The New Patient detail screen is displayed.
The New Patient detail screen is displayed.
2. Enter the Following:
|
Social Security # |
555555555 (no dashes) |
|
Date Of Birth |
1/1/1937 |
|
Sex |
Your Choice |
|
Last Name |
Patient |
|
First Name |
“Patient#” (Spelled Out – i.e. One) |
|
Street Address |
|
|
City |
Anytown |
|
State |
PA |
|
Postal Code |
10292 |
|
County |
Select from list |
|
Township |
Select from list (County must be selected first) |
|
Home Phone |
5555553132 (no dashes) |
3. Click ![]() to save the record
to save the record
![]() The Client Record screen is displayed along
with all the associated tabs.
The Client Record screen is displayed along
with all the associated tabs.
![]() If there is no social security number and
it is a required field, you may enter any string of numbers, such as
111111111 or 123456789.
If there is no social security number and
it is a required field, you may enter any string of numbers, such as
111111111 or 123456789.
![]() The Last Name and First Name fields are required
fields. The system will generate the Case Number, Creation Date and Created By
data automatically when the changes are updated.
The Last Name and First Name fields are required
fields. The system will generate the Case Number, Creation Date and Created By
data automatically when the changes are updated.
![]() It is recommended that as much information
about the Client as possible be entered. (This information may be received by a
telephone call, a walk-in or by an external medical Referral Source, etc.)
It is recommended that as much information
about the Client as possible be entered. (This information may be received by a
telephone call, a walk-in or by an external medical Referral Source, etc.)
To edit a Client Record
The Edit Client Record function allows users to view and update existing patient Demographic Information in addition to Contact, Guardian and Legacy Information.
1. Click on Client Search to find the New Client Record
2. Click Clear to clear the last search criteria
3. Type Patient in the Last Name field
4. Click the Case # associated with the New Patient to display the Client Record
Tip: Once the patient has been
selected, the “Client Record” menu item under the Patient Tracking menu may also
be used to access the Client Record
5. Select the Street Address field
6.
Type
7.
Click ![]() to Save the changes
to Save the changes
![]() The Case Number and Former Last Name
fields are view only.
The Case Number and Former Last Name
fields are view only.
![]() The
Last Name and First Name fields are required.
The
Last Name and First Name fields are required.
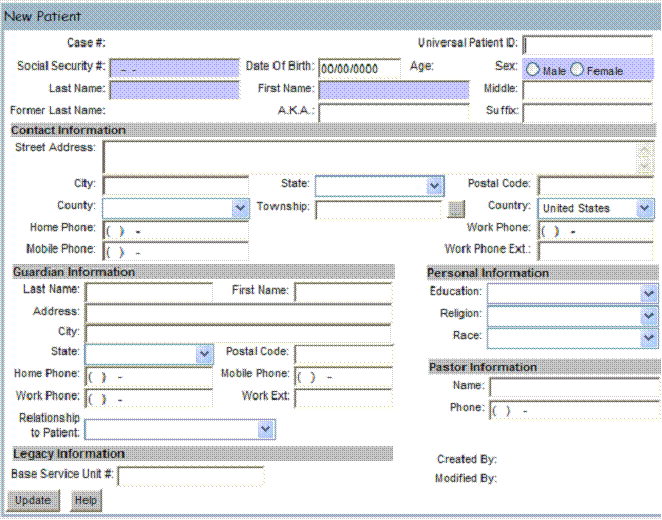
To view the address history
The View Address History function allows users to view all Previous Addresses associated with a Client Record.
1. Click
![]() on the Client Record
on the Client Record
![]() A new window is launched displaying all
addresses associated with this patient.
A new window is launched displaying all
addresses associated with this patient.
![]() All fields in this window are view only.
All fields in this window are view only.
2.
Click ![]()

The Payor Information tab allows users to view a summary of the Master Payor Ranking associated with the Client Record. From this summary view, a user (depending on their role) may select to add new Payors and view, update, or inactivate existing Payors.
To view Master Payor Information for a Client Record
The View Payor Information function allows users to view the Master Payor Ranking List for a selected Client Record.
1. Click the Payor Information tab
![]() Modifications may be made to the Rank and
Payor Status fields only. All other fields are view only.
Modifications may be made to the Rank and
Payor Status fields only. All other fields are view only.
To add a Payor to a patient record
1. Click Add
![]() The
required fields are highlighted.
The
required fields are highlighted.
![]() The
Payor Plan name and Benefit Effective Date are required fields. If the Benefit
Effective Date is not known, an admission date can be used.
The
Payor Plan name and Benefit Effective Date are required fields. If the Benefit
Effective Date is not known, an admission date can be used.
![]() If
no group number is entered, then the group number (if one exits) is copied from
the Payor Plan.
If
no group number is entered, then the group number (if one exits) is copied from
the Payor Plan.
![]() If the patient has multiple Payors,
indicate the order of billing preference by entering the Rank of the insurance
company in the Rank field as “1” for primary carrier, “2” for secondary, and so
on. If the Payor is no longer active, edit the Payor Ranking to “99”.
When adding a new payor, the rank order isn’t necessarily a priority at this
point. The payor can be added with any rank then re-ranked correctly after all
info is entered and the system is updated.
If the patient has multiple Payors,
indicate the order of billing preference by entering the Rank of the insurance
company in the Rank field as “1” for primary carrier, “2” for secondary, and so
on. If the Payor is no longer active, edit the Payor Ranking to “99”.
When adding a new payor, the rank order isn’t necessarily a priority at this
point. The payor can be added with any rank then re-ranked correctly after all
info is entered and the system is updated.
![]() The Payor Status field is view only
and will default to “Pending”. To edit the Payor Status, a staff selects the Client
Record, displays the Master Payor Ranking from the Payor Information screen and
selects the Edit link.
The Payor Status field is view only
and will default to “Pending”. To edit the Payor Status, a staff selects the Client
Record, displays the Master Payor Ranking from the Payor Information screen and
selects the Edit link.
![]() In the Subscriber Information section,
selecting the check box “Patient is Subscriber” indicates the patient is the
primary subscriber of the insurance company. If this box is checked, then all
subscriber information is copied from the Client Record.
In the Subscriber Information section,
selecting the check box “Patient is Subscriber” indicates the patient is the
primary subscriber of the insurance company. If this box is checked, then all
subscriber information is copied from the Client Record.
![]() If the patient is not the subscriber, complete
the Subscriber Information section including the Group and Policy No. and what
the relationship is to the patient. This is critical for billing to occur
correctly.
If the patient is not the subscriber, complete
the Subscriber Information section including the Group and Policy No. and what
the relationship is to the patient. This is critical for billing to occur
correctly.
![]() Any
additions or changes made to the Master Payor Ranking will be logged in the
Master Payor Change Report under the Patient Tracking Reports menu
Any
additions or changes made to the Master Payor Ranking will be logged in the
Master Payor Change Report under the Patient Tracking Reports menu
2. Enter data in the editable fields
3. Click
![]()
To edit Master Payor Information
The Edit Master Payor Information function allows users to modify the Rank or Status of an existing Master Payor Ranking.
![]() Changing
the Rank field has no effect on the Episode Payor Rankings on existing episodes. If the user selects the Edit link and changes
any Subscriber fields or any of the Benefit Effective Date, Expiration Date,
Payor Status or Benefits Assigned fields, then the changes are copied to all
patient episodes having this Payor Plan in the Episode Payor Ranking
Changing
the Rank field has no effect on the Episode Payor Rankings on existing episodes. If the user selects the Edit link and changes
any Subscriber fields or any of the Benefit Effective Date, Expiration Date,
Payor Status or Benefits Assigned fields, then the changes are copied to all
patient episodes having this Payor Plan in the Episode Payor Ranking
![]() The
system will not allow the patient to have 2 payors with the same rank
The
system will not allow the patient to have 2 payors with the same rank
![]() The
system will not allow the patient not to have a payor with a rank of one.
The
system will not allow the patient not to have a payor with a rank of one.
![]() The
Payor Status is a required field
The
Payor Status is a required field
To edit Master Payor Subscriber Information
The Edit Payor function allows users to view and edit an existing Payor associated with a Client Record.
1. Click on the Edit link next to a selected Master Payor.
![]() The system displays the Payor Detail screen
The system displays the Payor Detail screen
![]() The
Benefit Effective Date is defined as the date the benefits or insurance became
effective. This differs from the Rank Effective Date located in the Episode
Payor Ranking
The
Benefit Effective Date is defined as the date the benefits or insurance became
effective. This differs from the Rank Effective Date located in the Episode
Payor Ranking
![]() The
Payor Plan cannot be changed if the same payor exists on any existing episodes.
Otherwise, this field is editable and another payor may be selected.
The
Payor Plan cannot be changed if the same payor exists on any existing episodes.
Otherwise, this field is editable and another payor may be selected.
![]() The
Payor Plan and the Payor Status fields are required fields
The
Payor Plan and the Payor Status fields are required fields
![]() Any
changes to the subscriber information will be logged in the Subscriber Change
Report under the Patient Tracking Reports menu
Any
changes to the subscriber information will be logged in the Subscriber Change
Report under the Patient Tracking Reports menu
![]() Social
Security Number, Employer and Employee Status are new fields implemented with
Release 2.
Social
Security Number, Employer and Employee Status are new fields implemented with
Release 2.
![]() If a payor is a
If a payor is a
Episode History |

The Episode History tab allows users to view and create Admissions and Inquiries associated with the Client Record.
To view an Episode
The View Episode function allows users to view an Episode.
1. Click the Episode History tab
2. Select All for the Episode Type (system default)
3. Select All for the Episode Status (system default)
![]() All
fields on this screen are view only.
All
fields on this screen are view only.
![]() An Episode Status of Discharged
refers to a patient who has been Discharged from the Program but has not been
processed through Medical Records. An Episode Status of Closed has a
Discharged date and documentation of all Medical Record’s paperwork (admission
notes, discharge summaries, progress notes) has been completed. This is only valid
for certain types of care (Inpatient, Residential, Partial).
An Episode Status of Discharged
refers to a patient who has been Discharged from the Program but has not been
processed through Medical Records. An Episode Status of Closed has a
Discharged date and documentation of all Medical Record’s paperwork (admission
notes, discharge summaries, progress notes) has been completed. This is only valid
for certain types of care (Inpatient, Residential, Partial).
![]() Filters are available to sort the
information by Episode Type or Episode Status. (The system defaults to All).
For example: If the user only wishes to view Open Admissions, the Episode Type:
Admissions is selected and the Episode Status: Open is selected.
Filters are available to sort the
information by Episode Type or Episode Status. (The system defaults to All).
For example: If the user only wishes to view Open Admissions, the Episode Type:
Admissions is selected and the Episode Status: Open is selected.
|
|
Allergies/Medications |
Both tabs are currently connected to our e-prescribing partner, DrFirst. In order to add, view or edit a client allergy, click on Add and you will automatically be directed to the DrFirst website.
In order to add, view or
edit a client’s medication history, or create a new prescription, click on the
Medications tab and click on the e-Prescribe button, which will direct you to
the DrFirst website.
|
|
Alerts |

The Alerts tab allows users to view a summary of all Alerts associated with a Client Record.
From this summary view, a user may add new Alerts and view or update existing Alerts.
To view an Alert
The View Patient Alert function allows users to view a new Alert associated with a Client Record.
- Click the Alerts tab

![]() An Alert is a patient condition which staff
should be aware of, such as an allergy, a physical condition or substance
abuse. This information is normally collected during the assessment of the
patient by the
An Alert is a patient condition which staff
should be aware of, such as an allergy, a physical condition or substance
abuse. This information is normally collected during the assessment of the
patient by the
To add an alert
The Add Patient Alert function allows users to add a new Alert to a Client Record.
1. Click
![]()
2. Enter the Following:
|
Alert Type |
Violence |
|
Expiration Date |
“1 Month From Today” |
|
Alert Message |
Patient Could Become Violent |
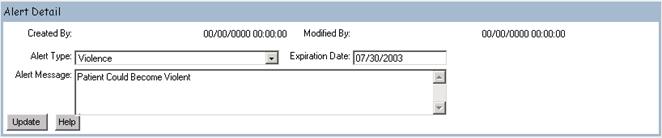
3. Click
![]()
To be notified of the alert
If the patient has an active Alert, the system will notify the user whenever that Patient’s Record is accessed. The system will also display a red alert box in the upper left hand corner of the Client Record screen. The Alert information can then be viewed by selecting the Alert tab.
1. Click Client Search
2. Type Patient (Or the last name of your newly created patient) in the Last Name field
3. Click
![]()
4. Click the Case # for the Newly Created patient to display the Client Record
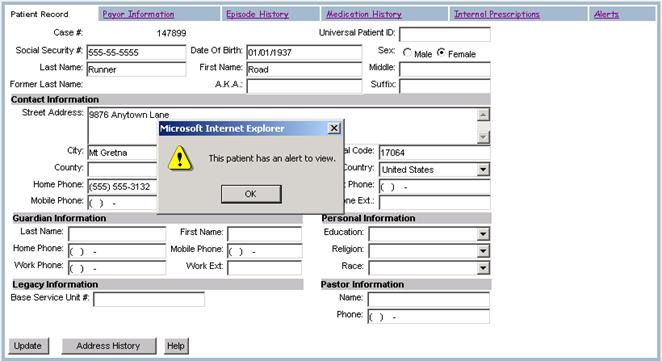
5. Click
![]() on the Alert message box
on the Alert message box
To edit an alert
The Edit Patient Alert function allows users to edit an existing Alert for an associated patient.
1. Click the Alerts tab
2. Click Edit to the right of the violence alert
3. Change the Following:
|
Expiration Date |
2 Months From Today |
4. Click
![]()
![]() Alerts
cannot be deleted. An expiration date can be applied to indicate that
the Alert is no longer active.
Alerts
cannot be deleted. An expiration date can be applied to indicate that
the Alert is no longer active.
![]() The Alert Type field is the only required
field.
The Alert Type field is the only required
field.
|
|
Documents |

The Documents tab allows users to add and view external documents related to a patient. These documents can be Word, PDF, Tiff, etc.
To View a Document
- Click the Documents tab

2. Click on the link under the Document Type heading for the document you wish to view. The document will then be displayed in the corresponding viewing tool (Word, Acrobat, etc.)
To add a Document
The Add Button allows users to add a new Document to a Client Record.
1. Click
![]()
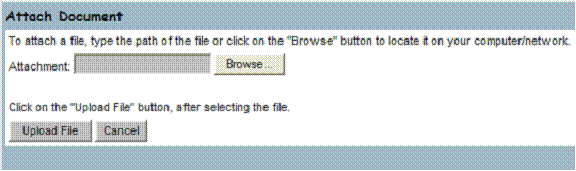
2. Click on the Browse button and select the file to attach.
3. Click on the Upload File button.
4. Enter in the Document Detail Information:

|
Document Type |
Scanned Medical Record |
|
Document Desc |
Archived Medical Records form 1/1/98 – 12/31/2000 |
|
Note |
Forms scanned from Archive |
- Click the Update Button and the document is now attached to the patient
To Edit a Documents properties
- Click the Edit link for the documents properties you would like to edit.
2. Update the Document Details and click the Update button to save the changes.
|
|
Liabilities |
The Liabilities tab allows users to add a
liability that can be applied to an Episode Payor that is a
To View a Liability
- Click the Liabilities tab

To add a Liability
The Add Button allows users to add a new Liability to a Client Record.
6. Click
![]()
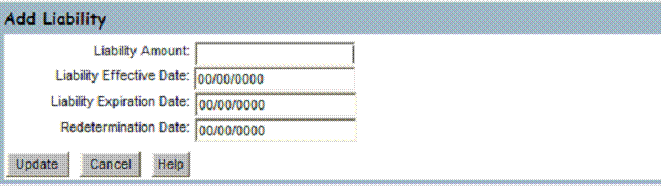
7. Enter the Liability amount effective and redetermination date. If the expiration date is known that can be entered now as well.
![]() Liabilities must be linked to an Episode Payor
in order for the system to process them when a charge is generated. Refer to the Attaching a Liability section to
see how a liability is attached to an Episode Payor.
Liabilities must be linked to an Episode Payor
in order for the system to process them when a charge is generated. Refer to the Attaching a Liability section to
see how a liability is attached to an Episode Payor.
|
Liability Amount |
$100 |
|
Liability Effective Date |
1/1/2005 |
|
Liability Expiration Date |
|
|
Redetermination Date |
12/31/2005 |
- Click the Update Button and the Liability is now created.
To Edit a Liablity
- Click the Edit link for the Liability you would like to edit.
2. Update the Liability information and click the Update button to save the changes.
|
|
Appointments
|

The
Appointments tab allows the user to view, reschedule or create new appointments
for clients. There are three filters
that allow the user to view past, future or all appointments.
1.
Click on
the Appointment tab.
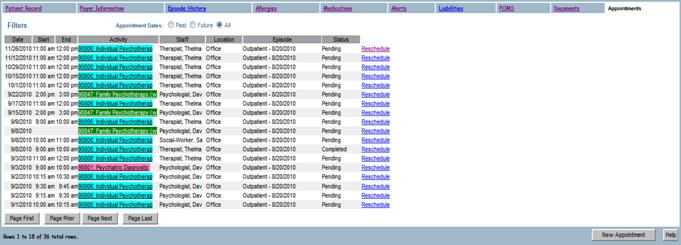
- If the facility chooses to use color coding for different activities (set up in Activity Maintenance under the Administration menu), each type of appointment will appear in the chosen color.
- If the user clicks on the Reschedule link, a second window will open with that user’s calendar, allowing a daily, weekly or monthly view. The rescheduled appointment can be made from that window.
- If the user needs to make an appointment with another staff member, the user will click on the New Appointment button. This will open another window with the appointment screen.
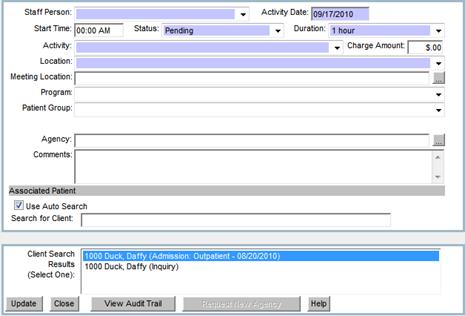
- Once the original user chooses a new staff person via the drop down menu, that new staff member’s calendar will appear on the right side of the screen.
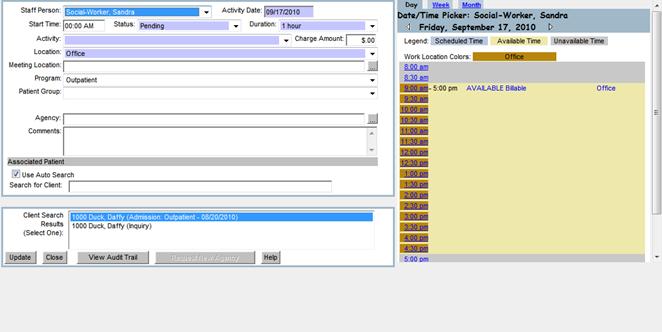
- From here, the user can either enter the information manually on the right side of the screen or use the selected staff’s calendar to find available dates and time slots.
- The user will then either enter a time manually on the left hand side of the screen (next to Start Time) or choose a time from the calendar.
- The user will then enter the appropriate time and activity, click on the appropriate episode for the client and click the Update button.
- The window will close after the user clicks on the Update button and the appointment is scheduled for that new staff member.
|
Lesson 4
|
|
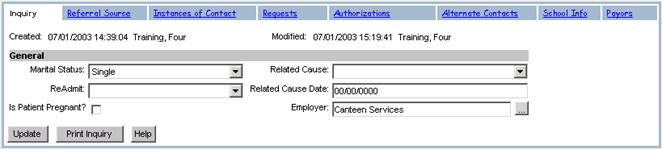
Inquiry |
An Inquiry contains patient information such as Marital Status, Employer, any Re-Admit dates and the Related Cause. Additional tabs list the Referral Source, any Instances Of Contact, Requests, Authorizations, Alternate Contacts, School Information, Payors and Forms. An Inquiry is where to enter information about a patient prior to admission.
To view an Inquiry
The Inquiry tab allows users to view and edit an existing Inquiry associated with a Client Record.
1. Click on Client Search from the Patient Tracking menu
2. Type Duck in the Last Name field
3.
Click ![]()
4. Click on the Case #1000
5. Click Episode History
6. Click on the Inquiry tab (Note: The system defaults to the Instances Of Contact tab)
To create an Inquiry
The Create Inquiry function allows users to create a new Inquiry associated with a Client Record.
![]() An Inquiry cannot be created if
there is already an Inquiry with a Status of "Open".
An Inquiry cannot be created if
there is already an Inquiry with a Status of "Open".
![]() If a patient is Admitted but the Inquiry
Status remains “Open”, the Inquiry has an unfulfilled Request within the
system.
If a patient is Admitted but the Inquiry
Status remains “Open”, the Inquiry has an unfulfilled Request within the
system.
1. Click on Client Search from the Patient Tracking menu
2. Type Patient in the Last Name field
3. Click
![]()
4. Click on the Case # of the patient
5. Click Episode History
6. Click
![]()
7. Enter the Following:
|
Marital Status |
Single |
|
Employer |
Canteen Services |
|
Hint:
Use the Ellipses Button to the right of the employer field to search for an
employer if there are more than 100 Employers in the system. If there are less than 100 Employers in the
system, the employer field will appear as a drop-down box |
|

![]() The “Is Patient Pregnant” indicator checkbox
indicates that "Yes" the patient is pregnant if checked and
"No" the patient is not pregnant if not checked.
The “Is Patient Pregnant” indicator checkbox
indicates that "Yes" the patient is pregnant if checked and
"No" the patient is not pregnant if not checked.
8. Click
![]()
To print an Inquiry
The Print Inquiry function first formats and then returns an Inquiry for the staff to view, print or send to various departments. The printed document displays the Client Demographics, Referral Source, any Alerts, Instances Of Contact Information and any Request Information related to the Inquiry.
1. Click the Inquiry tab
2. Click Print Inquiry
3. Close the Print Inquiry browser window
Tip: To obtain
a printout of this screen, click on the Print button from the Internet Explorer
toolbar or select the Print menu item from the File menu.
|
|
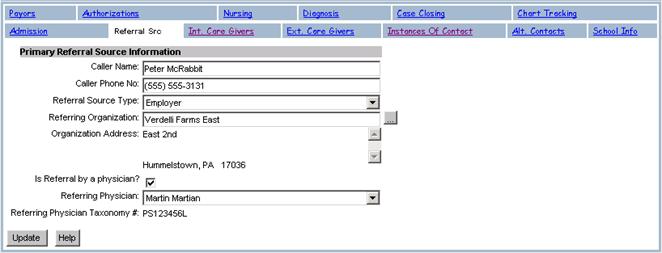
Referral Source |

The Referral Source is the initial contact your staff receives referring a client.
The Referral Source tab can also be utilized as a resource for verifying Referrals and their demographic information. It also allows users to create or update a Referral Source for an Inquiry or Admission.
To create a Referral Source
The Create Referral Source function allows users to create a new Referral Source.
1. Click the Referral Source tab
2. Enter the Following:
|
Caller Name |
Peter McRabbit |
|
Caller Phone No: |
610-555-3424 (no dashes) |
|
Referral Source Type |
Employer |
|
Is Referral By A Physician |
|
|
Referring Physician |
Buck Rogers |
3. Click
![]()

![]() The Organization Address and Referring
Physician Taxonomy # fields are view only and cannot be changed.
The Organization Address and Referring
Physician Taxonomy # fields are view only and cannot be changed.
![]() The Referral Source Type is the
relationship of the referring person and the patient. Such as clergy, family
friend or school.
The Referral Source Type is the
relationship of the referring person and the patient. Such as clergy, family
friend or school.
![]() You may enter a value for Referring
Organization only if a value has been entered for Referral Source Type.
After the Referral Source Type is entered and the Organization is selected from
the pick list, the Organization’s address will be displayed.
You may enter a value for Referring
Organization only if a value has been entered for Referral Source Type.
After the Referral Source Type is entered and the Organization is selected from
the pick list, the Organization’s address will be displayed.
![]() When
a Physician is selected from the pick list, the system automatically checks the
“Referral by a Physician” checkbox.
When
a Physician is selected from the pick list, the system automatically checks the
“Referral by a Physician” checkbox.
![]() If the desired Referring Physician does
not display on the list, contact your supervisor.
If the desired Referring Physician does
not display on the list, contact your supervisor.
![]() The
system only allows for one Referral Source. If another Referral Source
exists for the selected Episode, the existing Referral Source must be modified
with the new information.
The
system only allows for one Referral Source. If another Referral Source
exists for the selected Episode, the existing Referral Source must be modified
with the new information.
|
|
Instances Of Contact |

An Instance Of Contact allows documentation of information such as the Initial Staff Contact, Classification of Instance Of Contact, Contact/Caller Information, any Chemical Influences and any Presenting Problems associated with an Episode.
To view an Instance Of Contact
The Instance Of Contact tab allows users to view a summary of all Instances Of Contact associated with an Episode. From here the user is able to edit an existing Instance Of Contact or add a new one to the Client Record.
![]() Even though the Instance Of Contact is
associated in the system with an open Inquiry, additional Instances Of Contact
may be created for other Episodes.
Even though the Instance Of Contact is
associated in the system with an open Inquiry, additional Instances Of Contact
may be created for other Episodes.
1. Click the Instances Of Contact tab

To add an Instance Of Contact
The Add Instance Of Contact function allows users to add a new Instance Of Contact for an Episode in the system. The Instance Of Contact tracks correspondence relating to a patient or possible future patient.
![]() When an Inquiry is selected and the
Instance Of Contact information is entered or modified, the information will be
copied to the associated Admission for that patient.
When an Inquiry is selected and the
Instance Of Contact information is entered or modified, the information will be
copied to the associated Admission for that patient.
1. Click
![]()
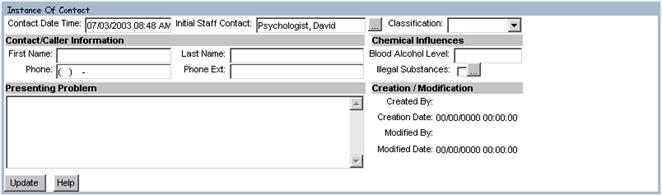
2. Enter the Following:
|
Contact Date Time |
Today’s Date And Time |
|
Initial Staff Contact |
Default |
|
Classification |
Phone Call |
|
First Name and Last Name |
Roger Rogerio |
|
Phone |
555-333-7771 (no dashes) |
|
Phone ext. |
2176 |
|
Presenting Problem |
Physical Instability – Exhibiting Suicidal Thoughts |
- Click

![]() The Classification is the type of Instance
Of Contact, such as a walk-in, telephone call or fax.
The Classification is the type of Instance
Of Contact, such as a walk-in, telephone call or fax.
![]() Staff
may add as many Instances Of Contact as needed.
Staff
may add as many Instances Of Contact as needed.
![]() Contact Date and Time, Contact Last Name,
First Name, Phone, Classification and Presenting Problem are all required
fields.
Contact Date and Time, Contact Last Name,
First Name, Phone, Classification and Presenting Problem are all required
fields.
![]() Presenting
problem does not have to be a diagnosis.
It can also include the content of the interaction between the staff and
the contact.
Presenting
problem does not have to be a diagnosis.
It can also include the content of the interaction between the staff and
the contact.
To view Presenting Problems
The View Presenting Problem function allows users to view all of the Instance Of Contact’s Presenting Problems associated with an Episode.
![]() The system does not allow modification of the
Presenting Problem information. If
changes are necessary, a new Instance Of Contact will need to be created.
The system does not allow modification of the
Presenting Problem information. If
changes are necessary, a new Instance Of Contact will need to be created.
- Click

![]() The following fields are view only: Contact Date, Initial Staff Contact, and
Presenting Problem.
The following fields are view only: Contact Date, Initial Staff Contact, and
Presenting Problem.
2.
Click ![]()
To edit an Instance Of Contact
The Edit Instance Of Contact function allows users to modify an existing Instance Of Contact.
1. Click the Edit link
2. Select Illegal Substance
3. Click
![]()
4. Enter the Following:
|
Illegal Substance |
Other Hallucinogens |
|
Route Of Administration |
Oral |
|
Substance Frequency |
Once Per Week |
![]() The
Illegal Substance information can only be added after an Instance Of
Contact has been updated.
The
Illegal Substance information can only be added after an Instance Of
Contact has been updated.
![]() The Illegal Substance field is a required
field
The Illegal Substance field is a required
field
![]() The following fields are view only:
Creation Date, Created By, Modified Date, and Modified By.
The following fields are view only:
Creation Date, Created By, Modified Date, and Modified By.
5. Click
![]()
|
|
Requests |
A Request can be created to keep a record of all patients waiting for the next Outpatient Appointment or Program vacancy.
![]() The
The
![]() The Scheduling
department maintains lists for Psychologist Credentialing and Cancellations.
Patients requesting to be seen by a non-credentialed Psychologist will be
placed on a waiting list until credentialing is approved.
The Scheduling
department maintains lists for Psychologist Credentialing and Cancellations.
Patients requesting to be seen by a non-credentialed Psychologist will be
placed on a waiting list until credentialing is approved.
![]() Physicians
or Therapists, who have no available Appointments, have their patients placed
on the waiting list until the next available Appointment. These patients may
also request to be contacted if an Appointment becomes available due to a
cancellation.
Physicians
or Therapists, who have no available Appointments, have their patients placed
on the waiting list until the next available Appointment. These patients may
also request to be contacted if an Appointment becomes available due to a
cancellation.
To view a Request
The Requests tab allows users to view a summary of all Requests associated with an Inquiry. From this summary view, a user may add new Requests and view or update existing Requests. The Access Center Request Waiting List function provides a means for staff to view a list of patients with Requests for your agencies services.
![]() From the Access Center Request Waiting List,
the system will display a list of Requests for a selected Type Of Care and
Program.
From the Access Center Request Waiting List,
the system will display a list of Requests for a selected Type Of Care and
Program.
1. Click the Requests tab

To add a Request
The Add Request function allows users to add a Request for an Inquiry in the system. A search should be performed first, by using the Access Center Request Mgmt. option from the Patient Tracking menu, to verify that a Request for that patient doesn’t already exist.
1. Click
![]()
2. Enter the Following:
|
Request Type |
Partial Hosp Request |
|
Evaluator |
The name of the person recording the request |
|
Type Of Care |
Partial |
|
Program |
Acute Partial Hosp |
|
Request Priority |
Medium |
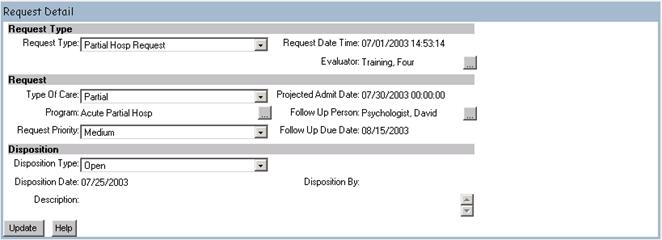
![]() A Request Type can be an Information
Request, Inpatient Request, Outpatient Request, Other or Partial Hospital, etc
A Request Type can be an Information
Request, Inpatient Request, Outpatient Request, Other or Partial Hospital, etc
![]() It
is important to enter the Type Of Care and Program of the Request to ensure both the Request and the Inquiry
close if the patient is admitted. The Inquiry and Request will have a
Status of “Closed” and “Admitted” respectively, only when the Type Of Care and
Program of the new Admission match the Request.
It
is important to enter the Type Of Care and Program of the Request to ensure both the Request and the Inquiry
close if the patient is admitted. The Inquiry and Request will have a
Status of “Closed” and “Admitted” respectively, only when the Type Of Care and
Program of the new Admission match the Request.
![]() The Request Type and Request Date and Time
are required fields. The date and time will default to the current
system date and time.
The Request Type and Request Date and Time
are required fields. The date and time will default to the current
system date and time.
![]() Admitting the patient from the Access
Center Request Management screen will allow the user to select a Type Of Care
and Program if neither had been previously selected.
Admitting the patient from the Access
Center Request Management screen will allow the user to select a Type Of Care
and Program if neither had been previously selected.
3. Click
![]()
To edit a Request
The Edit Request function allows users to edit or view an existing request for an Episode in the system.
1. Click Edit
2. Change the Following:
|
Request Priority |
Low |
3. Click
![]()
![]() The Request Priority Status may help to
determine the next patient to be admitted from the waiting list for a Program.
The Request Priority Status can be edited through the patient’s Inquiry or
through the Access Center Request Management menu.
The Request Priority Status may help to
determine the next patient to be admitted from the waiting list for a Program.
The Request Priority Status can be edited through the patient’s Inquiry or
through the Access Center Request Management menu.
![]() The Request Type field is a required
field. The Request Date and Time and
Disposition By fields are view only.
The Request Type field is a required
field. The Request Date and Time and
Disposition By fields are view only.
|
|
Authorizations |
The Authorizations tab allows users to view a summary of all Authorizations associated with an Inquiry. From this summary view, a user can create, view, and edit Authorizations for an Inquiry.
To view Authorizations
The View Authorizations function allows users to view Authorizations associated with an Inquiry.
1.
Click Authorizations
![]() The list of authorizations can be sorted by
“All”, “Current” or “History”
The list of authorizations can be sorted by
“All”, “Current” or “History”
To add an Episode Authorization
The Add Episode Authorization function allows users to add a new Authorization on an Inquiry record.
1.
Click ![]()
2.
Select Blue Cross (65 Choice)
3.
Click ![]()
Alert: Adding An Authorization Is Done Later In The Course
![]() When
adding a new Authorization, the system will display a message prompting the
user to associate the new Authorization with an existing Payor. After the Payor
is selected, Authorization details can be added.
When
adding a new Authorization, the system will display a message prompting the
user to associate the new Authorization with an existing Payor. After the Payor
is selected, Authorization details can be added.
To edit an Episode Authorization
The Edit Episode Authorization function allows users to edit
an existing Authorization for an Inquiry in the system.
1. Click the Edit link next to the Newly Created Authorization and make the necessary changes
2. Click
![]()
Alert: Editing An Authorization Is Done Later In The Course
|
|
Alternate Contacts |

The Alternate Contacts tab contains the Contact Type, such as a psychologist, parent, pastor, etc., Home and Work Phone, and the First and Last Names of the Alternate Contact.
To view an Alternate Contact
The View Alternate Contact function allows users to view a summary of the Alternate Contacts associated with a patient’s Episodes.
1. Click Alternate Contacts

![]() The
following fields are view only:
Contact Type, Phone Number, Last Name, First Name, Work Phone Number,
Work Phone Extension and Mobile Phone Number.
The
following fields are view only:
Contact Type, Phone Number, Last Name, First Name, Work Phone Number,
Work Phone Extension and Mobile Phone Number.
To add an Alternate Contact
The Add Alternate Contact function allows users to add a new Alternate Contact for an Episode.
1. Click
![]()
2. Enter the Following:
|
Contact Type |
Sibling |
|
Home Phone |
610-777-6666 (no dashes) |
|
Last Name |
Contact |
|
First Name |
|
3. Click
![]()
![]() The Alternate Contact Type, Last Name,
First Name and Phone Number are required fields.
The Alternate Contact Type, Last Name,
First Name and Phone Number are required fields.
![]() The
Alternate Contact Type is the relationship between the Alternate Contact and
the patient such as family, friend, external caregiver, physician, pastor, etc.
The
Alternate Contact Type is the relationship between the Alternate Contact and
the patient such as family, friend, external caregiver, physician, pastor, etc.
To edit an Alternate Contact
The Edit Alternate Contact function allows users to edit an existing Alternate Contact for an Episode.
1. Change the Following:
|
Home Phone |
610-987-3445 (no dashes) |
2. Click
![]()
|
|
School Information |

To view School Information
The view School Info function allows users to view or update School Information associated with an Episode.
1. Click on the School Info tab
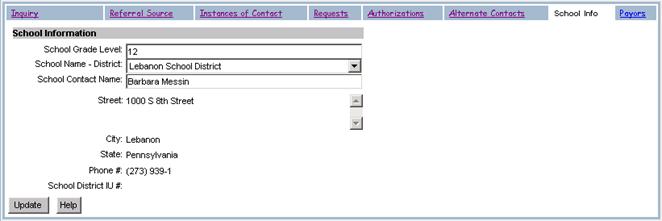
To add School Information
The Add School Info function allows users to add School Information associated with an Episode.
1. Click on the School Info tab
2. Enter the Following:
|
School Grade Level |
11 |
|
School Name-District |
|
|
School Contact Name |
Barbara Messin |
3. Click ![]()
To edit School Information
The Edit School Info function allows users to view and/or update School Information associated with an Episode.
1. Click on the School Grade Level ellipses
2. Change the Following:
|
School Grade Level |
12 |
3. Click
![]()
![]() The following fields are view only: Street Address, City, State, Phone Number,
and School District IU #.
The following fields are view only: Street Address, City, State, Phone Number,
and School District IU #.
|
|
Episode Payor Ranking |

From the Inquiry or Admission screen, the Payors tab allows adding, viewing, updating or deleting existing Payors. From here, staff can select a Payor from the Master Payor List and link it to the selected Episode.
![]() The Master Payor Ranking can be accessed
from the episode by selecting the Master link
The Master Payor Ranking can be accessed
from the episode by selecting the Master link
To view Payor Information associated with an Episode
The View Payor Information function allows users to view existing Payor Information.
1.
Click the Payors tab
To add a Payor to an Episode
The Add Payor Information function allows staff, based on security permissions, to select an existing payor from the Master Payor Ranking and associate it to the selected episode.
Note: If no Payor Information exists on the Master Payor Ranking in the Client Record screen, a selection of payors will not be available to associate to the episode.
1. Click
![]()

![]() A
list of confirmed payors with rank not equal to 99 will be displayed.
A
list of confirmed payors with rank not equal to 99 will be displayed.
![]() Only
payors on the Master Payor Ranking with a status of Confirmed can be added to
the Episode Payor Ranking. If you aren’t
seeing any payors to add to the episode, go to the Client Record and add a
confirmed payor to the Master Payor Ranking.
Only
payors on the Master Payor Ranking with a status of Confirmed can be added to
the Episode Payor Ranking. If you aren’t
seeing any payors to add to the episode, go to the Client Record and add a
confirmed payor to the Master Payor Ranking.
2. Select the Add link next to the payor to be added to the episode.
3. The system adds the selected payor to the
Episode Payor Ranking
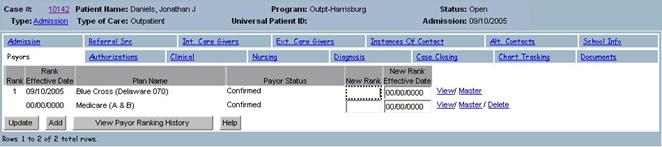
![]() The
Rank, Rank Effective Date, New Rank and New Rank Effective Date fields contain
null values.
The
Rank, Rank Effective Date, New Rank and New Rank Effective Date fields contain
null values.
![]() The
New Rank and New Rank Effective Date are the only editable fields. The Payor
Status can only be changed from the Master Payor Ranking
The
New Rank and New Rank Effective Date are the only editable fields. The Payor
Status can only be changed from the Master Payor Ranking
![]() The Delete link will remain functional
until values are entered in the New Rank and the New Rank Effective Date
fields. After selecting Update, the New Rank and New Rank Effective Date values
will be copied to the Rank and Rank Effective Date fields.
The Delete link will remain functional
until values are entered in the New Rank and the New Rank Effective Date
fields. After selecting Update, the New Rank and New Rank Effective Date values
will be copied to the Rank and Rank Effective Date fields.
![]() The
View link allows the user to view the selected payor subscriber information. No
modifications can be made through this feature.
The
View link allows the user to view the selected payor subscriber information. No
modifications can be made through this feature.
To edit Payor Information associated with an Episode
The Edit Payor Information function allows the user to modify the New Rank and New Rank Effective Date fields only. All other fields are view only. If other information needs to be entered or modified, such as subscriber information, that must be done from the master payor ranking (accessed from the Payor Information tab on the Client Record).
1. Modify the existing values or add new values in the New Rank and the New Rank Effective Date for the payors listed in the episode ranking
![]() If the New Rank is entered for an episode
payor, the New Rank Effective Date must also be entered. The same applies to
entering the New Rank Effective Date.
If the New Rank is entered for an episode
payor, the New Rank Effective Date must also be entered. The same applies to
entering the New Rank Effective Date.
![]() The New Rank entered must be a numerical
value between 1 and 99
The New Rank entered must be a numerical
value between 1 and 99
![]() If
a Benefit Effective Date is indicated on the Master Payor Ranking then the New
Rank Effective Date must be greater than or equal to the Benefit Effective
Date.
If
a Benefit Effective Date is indicated on the Master Payor Ranking then the New
Rank Effective Date must be greater than or equal to the Benefit Effective
Date.
![]() If
a Benefit Expiration Date exists on the Master Payor Ranking, the New Rank
Effective Date must be less than or equal to the Benefit Expiration Date.
If
a Benefit Expiration Date exists on the Master Payor Ranking, the New Rank
Effective Date must be less than or equal to the Benefit Expiration Date.
![]() If
the New Rank for an episode payor is less than 99 and the Master Payor Ranking
is 99, the system will prevent the New Rank from being saved.
If
the New Rank for an episode payor is less than 99 and the Master Payor Ranking
is 99, the system will prevent the New Rank from being saved.
![]() If
a New Rank Effective Date is less than or equal to the current system date,
then any charge with it’s date of service less than or equal to the current
system date has its charge payor ranking modified to reflect the new rank
changes for this episode.
If
a New Rank Effective Date is less than or equal to the current system date,
then any charge with it’s date of service less than or equal to the current
system date has its charge payor ranking modified to reflect the new rank
changes for this episode.
![]() If
changes are made to the New Rank and New Rank Effective Date on a payor in the
episode ranking, modifications must be made to the other payors in the episode
ranking so the following conditions are met;
If
changes are made to the New Rank and New Rank Effective Date on a payor in the
episode ranking, modifications must be made to the other payors in the episode
ranking so the following conditions are met;
· The system will not allow 2 payors in the ranking with the same Rank on the same date. One of these payors may have a New Rank equal to that of the other payor but the New Rank Effective Date must be set for a date in the future.
· If a New Rank Effective Date is entered that is less than the current system date then all other payor rankings in the episode with a Rank Effective Date must have the same New Rank Effective Date.
To delete Payors associated with an Episode
Payors can only be deleted from an Episode after the payor is added to the Episode Payor Ranking and before the New Rank and New Rank Effective Date fields are entered. After the New Rank and New Rank Effective Date fields have been saved to the database, the Delete link will no longer be available. However, changing the payor rank to 99 will tell the system to ignore that payor.
![]() If Payor is not valid at all, make sure
the New Rank Effective Date is the same as the Admission Date.
If Payor is not valid at all, make sure
the New Rank Effective Date is the same as the Admission Date.
![]() Deleting a Payor from the Episode will
only remove it from the Payor list of the patient Episode not from the
Master Payor List of the Client Record.
Deleting a Payor from the Episode will
only remove it from the Payor list of the patient Episode not from the
Master Payor List of the Client Record.
![]() If
the Payor has associated Authorizations and you enter a New Rank of 99, the
system will display a warning indicating Authorizations exist.
If
the Payor has associated Authorizations and you enter a New Rank of 99, the
system will display a warning indicating Authorizations exist.
|
|
Forms
|

The Forms tab can be used to add forms to the Inquiry Episode. This differs from the Documents tab discussed earlier in that the Documents tab is useful for scanning in external documents into Epitomax, where they are view only. The Forms tab is useful for documents the facility may want to fill-out prior to admitting a client. For example, agreements regarding dates/times of therapy sessions or evaluations to determine level of care can be added or edited from the Forms tab.

To
Add a Form to the Inquiry Episode
1.
Click on the ![]() button.
button.
2.
A second window will pop up with a drop-down
box. The user can use the drop-down box
to find and select the correct form.
![]() The
user may use the
The
user may use the ![]() button to view the first page of the document
in order to ensure the correct form is being chosen prior to adding it to the
Inquiry.
button to view the first page of the document
in order to ensure the correct form is being chosen prior to adding it to the
Inquiry.
3. Once the correct form has been added, staff can use the Edit link to complete the form.
To
Add a Form Packet to the Inquiry Episode
1. In order to Add a Form Packet, a packet must be created in the Form Packet Maintenance link under the Administration tab (see your System Administrator).
2.
Click on the ![]() button.
button.
3. A second window will pop up with a drop-down box. The user can choose the appropriate Form Packet to add several forms at once.
![]() Since
there are several forms attached, the preview option is not available.
Since
there are several forms attached, the preview option is not available.
4. Once the correct form packet has been added, staff can use the Edit link to complete each form.
|

The Access Center Request Waiting List function provides a
means for the
To submit an Access Center
The Submit Access Center Request function allows users to
submit an
1. Click the Access Center Request Mgmt link from the Patient Tracking main menu
2. Enter the Following:
|
Type Of Care |
Partial |
|
Program |
Acute Partial Hosp |

3. Click
![]()

|
|
Lesson 5
|
|
|
· Admissions · Referral Source · Internal Care Givers · External Care Givers · Instances Of Contact · Presenting Problems · Requests · Alternate Contacts |
· School Info · Payors · Authorizations · Nursing · Diagnosis · Case Closing · Chart Tracking |
|
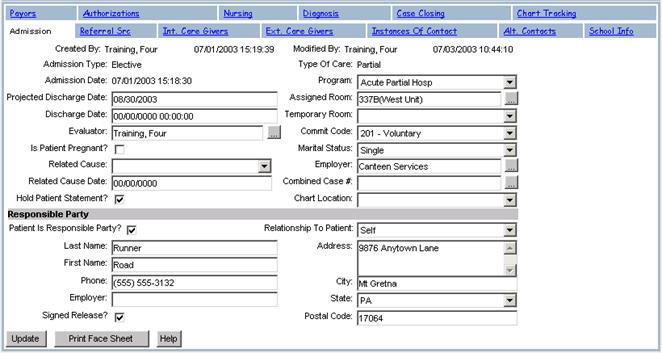
Admissions |
An Admission (Inpatient, Outpatient, Partial Hospitalization, etc…) Program displays the Admission Type, Date, Projected Discharge Date, Commit Code and other related information. From here, staff can access the patient’s referral information, internal and external caregivers, Instances Of Contact, Alternate Contacts, School Information, Payor Information, Authorizations, Nursing information, Diagnosis data, Case Closing information, and Chart Tracking.
To view an Admission
The View Admission function allows users to view an Admission.
1.
Click on Client Search
2.
Type Runner in the Last Name field
3.
Click ![]() on the Alert message box
on the Alert message box
4.
Click Case # 147899 for Runner, Road
5.
Click Episode History
6.
Click Admission… Acute Partial Hosp
![]()
![]()
7. Click the Referral Src through the Chart Tracking tab to view associated information
8. Click the Patient Case # to return to the main Client Record screen
9. Click
![]() on the Alert message box
on the Alert message box
To create an Admission
The Create Admission function allows users to create an Admission.
1.
Perform a Client Search for
Your Patient
2. Access the Client Record
3.
Click Episode History
4.
Click ![]()
5.
Select Outpatient for the Type Of Care
6.
Enter the Following:
|
Admission Type |
Elective |
|
Admission Date |
Today’s Date |
|
Program |
Outpt-Mt. |
|
Evaluator |
Default |
|
Commit Code |
Voluntary |
|
Marital Status |
Single |
|
Employer |
Canteen Services |
|
Patient Is Responsible Party |
|
7.
Click ![]()
*
Pretend It is Next Month….And Your
Patient Needs To
Be Admitted To The Inpt-Behavioral Evaluation Program
1. Click Client Record on the Patient Tracking menu
2. Click
![]() on Alert message box
on Alert message box
3. Click Episode History
4. Click
![]()
5. Select Inpatient for the Type Of Care
6. Enter the Following:
|
Admission Type |
Elective |
|
Admission Date |
1 Month From Today’s Date |
|
Projected Discharge Date |
2 Months From Today’s Date |
|
Evaluator |
Your Staff Member (Default) |
|
Program |
Inpt-Behavioral Evaluation |
|
Commit Code |
Voluntary |
|
Marital Status |
Single |
|
Employer |
Canteen Services |
|
Patient Is Responsible Party |
|
7. Click
![]()
* Pretend
It is Next Month….And Your Patient Needs To
Be Admitted To The
8.
Click Client Record on Patient
Tracking menu
9.
Click ![]() on Alert message box
on Alert message box
10. Click
Episode History
11. Click
![]()
12. Select
Partial for the Type Of Care
13. Enter
the Following:
|
Admission Type |
Elective |
|
Admission Date |
2 Months From Today’s Date |
|
Projected Discharge Date |
3 Months From Today’s Date |
|
Evaluator |
Your Staff Member (Default) |
|
Program |
Acute Partial Hosp |
|
Commit Code |
Voluntary |
|
Marital Status |
Single |
|
Employer |
Canteen Services |
|
Patient Is Responsible Party |
|
14. Click
![]()
![]() When an Admission is created from the Open
Inquiry, the Inquiry will be closed.
When an Admission is created from the Open
Inquiry, the Inquiry will be closed.
![]() If an Open Inquiry is used, then the Payor
Ranking, Referral Source and School Information is linked to the new Admission.
If an Open Inquiry is used, then the Payor
Ranking, Referral Source and School Information is linked to the new Admission.
Alert: Verify that the
To edit an Admission
The Edit Admission function allows users to edit an Admission.
1. Perform a Client Search for Your Patient
2. Access the Client Record
3. Click Episode History
4. Click on the Inpatient Admission
5. Change the Following:
|
Projected Discharge Date |
1 Month Later |
- Click
![]() Case Number, Universal Patient ID, Last
Name, First Name, Creation Date, Created By, Modified Date, Modified By, Type
Of Care, Admission Type, and Admission Date & Time are view only
fields. The Program field is a required
field.
Case Number, Universal Patient ID, Last
Name, First Name, Creation Date, Created By, Modified Date, Modified By, Type
Of Care, Admission Type, and Admission Date & Time are view only
fields. The Program field is a required
field.
![]() If the Discharge Date and Time is set,
then the Status of the Admission becomes "Discharged" instead of
“Open”.
If the Discharge Date and Time is set,
then the Status of the Admission becomes "Discharged" instead of
“Open”.
![]() If the Program is changed, then the
Internal Care Giver list must be updated to change the Attending Physician.
If the Program is changed, then the
Internal Care Giver list must be updated to change the Attending Physician.
To print Admission details
The Print Admission function allows users to print an Admission.
1.
Click ![]() (Prints to new Internet explorer browser
window)
(Prints to new Internet explorer browser
window)
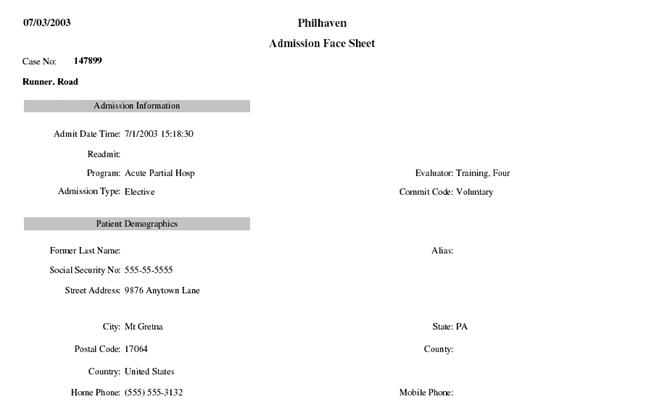
2.
Select File in Internet Explorer
3.
Select Print
4.
Close Print Face Sheet browser window
|
|
Referral Source |

The Referral Source tab allows users to view, create or update a Referral Source for an Admission.
To view a Referral Source
The View Referral Source function allows users to view a Referral Source.
1. Click the Referral Source tab
To add/update a Referral Source
The Add/Update Referral Source function allows users to add/update a Referral Source.
1. Click the Referral Source tab
2. Enter the Following:
|
Caller Name |
Peter McRabbit |
|
Caller Phone No |
555-555-3131 (no dashes) |
|
Is Referred By A Physician |
|
|
Referring Physician |
Martin Martian |
3. Click
![]()
4. Change the Following:
|
Caller Phone No |
610-555-3137 (no dashes) |
5. Click
![]()
![]() The Organization Address and Referring
Physician Taxonomy # fields are view only and cannot be changed.
The Organization Address and Referring
Physician Taxonomy # fields are view only and cannot be changed.
![]() You may enter a value for Referring
Organization only if a value has been entered for Referral Source Type.
You may enter a value for Referring
Organization only if a value has been entered for Referral Source Type.
![]() If
a new Referring Physician needs to be added, contact your
supervisor.
If
a new Referring Physician needs to be added, contact your
supervisor.
|
|
Internal Care Givers |

The Int. Care Givers tab allows users to view a summary of the Internal Care Givers associated with an Admission. An Internal Care Giver can be any of your staff with a role of attending physician, care manager or psychologist. From this summary view, a user may select a different Internal Care Giver and view or update existing Internal Care Givers for the selected Admission.
To view Internal Care Givers
The View Internal Care Giver function allows users to view an Internal Care Giver associated with an Admission in the system.
1. Click the Internal Care Givers tab

![]() The list of existing Internal Care Givers can
be filtered by
The list of existing Internal Care Givers can
be filtered by
To add an Internal Care Giver
The Add Internal Care Giver function allows users to associate an Internal Care Giver with an Admission.
1.
Click ![]()
2.
Enter the Following:
|
Care Giver Role |
Registered Nurse |
|
Staff Person |
Big Bird |

3.
Click ![]()
![]() Care Giver Role and Staff have to be valid
combinations. If not, your supervisor may need to be contacted.
Care Giver Role and Staff have to be valid
combinations. If not, your supervisor may need to be contacted.
![]() If the user chooses to cancel prior to saving
changes, then the Internal Care Giver record will not be inserted.
If the user chooses to cancel prior to saving
changes, then the Internal Care Giver record will not be inserted.
To edit an Internal Care Giver
The Edit Internal Care Giver function allows users to edit an Internal Care Giver associated with an Admission in the system.
1.
Click the Edit link next to the
Newly Created care giver
2.
Change the Following:
|
Care Giver Role |
Oscar Grouch |
3.
Click ![]()
To delete an Internal Care Giver
The Delete Internal Care Giver function allows users to delete an Internal Care Giver associated with an Admission.
Alert: For Training Purposes, Do Not Delete Internal Care Giver
1.
Click the Delete link next to the Newly
Created Internal Care Giver
![]() The "Confirm Delete" screen will be
displayed.
The "Confirm Delete" screen will be
displayed.

2. Click Delete
|
|
External Care Givers |

The Ext. Care Givers tab allows users to view a summary of the External Care Givers associated with a patient. An example of an External Care Giver would be a caseworker or family physician. The user enters the phone #, fax # and address of the External Care Giver.
To view an External Care Giver
The View External Care Giver function allows users to view an External Care Giver associated with an Admission.
1. Click the Ext. Care Givers tab

To create an External Care Giver
The Create External Care Giver function allows users to associate an External Care Giver with an Admission in the system.
1. Click
![]()
2. Enter the Following:
|
Care Giver Role |
Case Worker |
|
Care Giver Name |
Mary McBeth |
|
Phone # |
610-777-9889 (no dashes) |
|
Phone ext |
3212 |
|
Street Address |
|
|
City |
|
|
State |
PA |
|
Postal Code |
13216 |
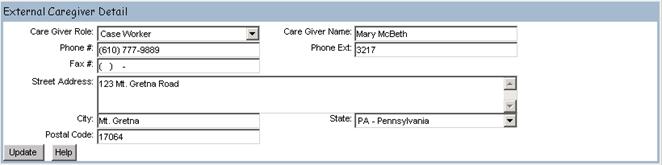
3. Click
![]()
![]() Care Giver Name, Phone and Role are required
fields.
Care Giver Name, Phone and Role are required
fields.
To edit an External Care Giver
The Edit External Care Giver function allows users to edit an External Care Giver associated with an Admission.
1.
Click the Edit link next to the Newly
Created External Care Giver
2. Change the Following:
|
Phone Ext. |
3217 |
3. Click
![]()
![]() The Care Giver Name, Phone # and Role
fields are required. If the user
chooses to cancel prior to saving changes, then the External Care Giver record
will not be updated.
The Care Giver Name, Phone # and Role
fields are required. If the user
chooses to cancel prior to saving changes, then the External Care Giver record
will not be updated.
To delete an External Care Giver
The Delete External Care Giver function allows users to delete an External Care Giver associated with an Admission.
Alert: For Training Purposes, Do Not Delete External Care Giver
1.
Click the Delete link next to the Newly
Created care giver
![]() The "Confirm Delete" screen will be
displayed. The user can select another menu item or tab to cancel the Delete function.
The "Confirm Delete" screen will be
displayed. The user can select another menu item or tab to cancel the Delete function.

2.
Click ![]()
|
|
Instances Of Contact |
The Instance Of Contact tab allows users to view a summary of all Instances Of Contacts associated with an Episode. An Instance Of Contact provides information about the contact person. From this summary view, a user may add new Instances Of Contacts and view or existing Instances Of Contacts.
To view an Instance Of Contact
The View Instances Of Contact function allows users to view an Instance Of Contact for an Admission.
1. Click on the Instances Of Contact tab

![]() If the Instances Of Contact tab is
accessed from an Admission record, then the Instances Of Contact for the
associated Inquiry (if one exists) are displayed along with the Instance Of
Contacts created for the Admission.
If the Instances Of Contact tab is
accessed from an Admission record, then the Instances Of Contact for the
associated Inquiry (if one exists) are displayed along with the Instance Of
Contacts created for the Admission.
To create an Instance Of Contact
The Create Instance Of Contact function allows users to create a new Instance Of Contact for an Admission.
1.
Click ![]()
2.
Enter the Following:
|
Contact Date |
Today’s Date (Default) |
|
Initial Staff Contact |
Staff Member |
|
Classification |
Phone Call |
|
First Name |
Road |
|
Last Name |
Runner |
|
Phone |
610-999-8888 (no dashes) |
|
Phone Ext. |
2345 |
|
Presenting Problem |
Patient could become violent without much warning |
3. Click
![]()
![]() Contact Date and Time, Contact Last Name,
First Name, Phone, Classification and Presenting Problem are all required
fields.
Contact Date and Time, Contact Last Name,
First Name, Phone, Classification and Presenting Problem are all required
fields.
To edit an Instance Of Contact
The Edit Instance Of Contact function allows users to modify existing contact info for an Admission.
1.
Click the Edit link next to the Newly
Created Instance Of Contact
2. Change the Following:
|
Phone Extension |
3556 |
3. Click
![]()
![]() Contact Last Name, First Name, Phone and
Classification are required fields.
The Contact Date and Time and Presenting Problem are view only
fields.
Contact Last Name, First Name, Phone and
Classification are required fields.
The Contact Date and Time and Presenting Problem are view only
fields.
To view Instance Of Contact Illegal Substance summary
The View Instance Of Contact Illegal Substance Summary function allows users to view a summary of the Illegal Substances associated with an existing Instance Of Contact for an Inquiry or Admission.
1.
Click the Edit link next to the Newly
Created Instance Of Contact
2.
Click the Ellipses next to Illegal
Substances
![]() A
new browser window is displayed
A
new browser window is displayed
![]() If
the Illegal Substances checkbox is checked, the system returns the Instance Of
Contact Illegal Substances screen when the pick list is selected.
If
the Illegal Substances checkbox is checked, the system returns the Instance Of
Contact Illegal Substances screen when the pick list is selected.
To create an Instance Of Contact Illegal Substance
The Create Instance Of Contact Illegal Substance function allows users to create a new Illegal Substance associated with an existing Instance Of Contact record.
![]() The
Illegal Substance information can only be added after an Instance Of Contact
has been updated.
The
Illegal Substance information can only be added after an Instance Of Contact
has been updated.
1.
Click Add (On the Instance Of Contact
Illegal Substances browser window)
2.
Enter the Following:
|
Illegal Substance |
Other Sedatives |
|
Route Of Administration |
Oral |
|
Substance Frequency |
Once Per Week |
3. Click
![]()
![]() The Illegal Substance field is a required
field.
The Illegal Substance field is a required
field.
To edit an Instance Of Contact Illegal Substance
The Edit Instance Of Contact Illegal Substance function allows users to edit an existing Illegal Substance associated with the Instance Of Contact.
1. Click on the Edit link next to the Newly Created Illegal Substance
2. Change the Following:
|
Substance Frequency |
Once Per Day |
3. Click
![]()

4. Click
![]() to close the Illegal Substance browser
window
to close the Illegal Substance browser
window
![]() The Illegal Substance field is a required
field.
The Illegal Substance field is a required
field.
![]() The following fields are view only:
Creation Date, Created By, Modified Date, and Modified By.
The following fields are view only:
Creation Date, Created By, Modified Date, and Modified By.
To view Presenting Problem history
The View Presenting Problem History function allows users to view all Instances Of Contact Presenting Problems associated with an Admission.
1.
Click ![]()
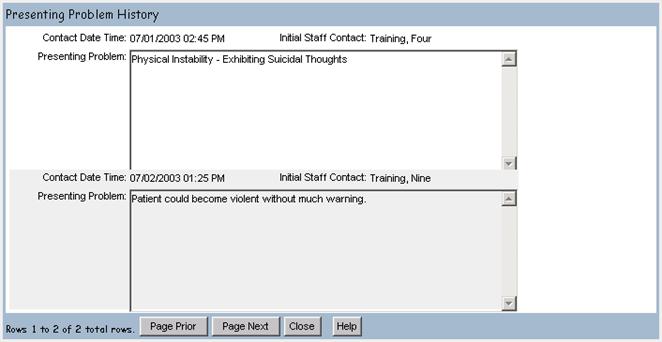
2.
Click ![]() to close the Presenting Problems browser
window
to close the Presenting Problems browser
window
![]() The
following fields are view only:
Contact Date, Initial Staff Contact, and Presenting Problem.
The
following fields are view only:
Contact Date, Initial Staff Contact, and Presenting Problem.
![]() To scroll through multiple entries, use the
Page Prior and Page Next buttons.
To scroll through multiple entries, use the
Page Prior and Page Next buttons.
|
|
Alternate Contacts |

The Alternate Contacts tab allows users to view a summary of the Alternate Contacts for a selected patient and associate them to an Admission. From this summary view, a user may create a new Alternate Contact or update existing Alternate Contacts.
To view Alternate Contacts
The View Alternate Contacts function allows users to view an Alternate Contact for an Admission.
1. Click the Alternate Contacts tab

To create an Alternate Contacts
The Create Alternate Contact function allows users to create a new Alternate Contact for an Admission.
1.
Click ![]()
2.
Enter the Following:
|
Contact Type |
Power Of Attorney |
|
Home Phone |
610-333-2222 (no dashes) |
|
Last Name |
Attorney |
|
First Name |
Adam |
3.
Click ![]()
![]() The
Alternate Contact screen will also list any Alternate Contacts associated with
the Inquiry.
The
Alternate Contact screen will also list any Alternate Contacts associated with
the Inquiry.
![]() The Alternate Contact Type, Last Name, First
Name and Phone Number are required fields.
The Alternate Contact Type, Last Name, First
Name and Phone Number are required fields.
To edit an Alternate Contact
The Edit Alternate Contact function allows users to edit an existing Alternate Contact for an Admission.
1. Click in Newly Created Alternate Contact
2. Change the Following:
|
Home Phone |
610-444-9090 (no dashes) |
3. Click
![]()
|
|
School Information |
To view School Information
The View School Information function allows users to view and/or update School Information associated with an Admission.
1. Click on the School Info tab
![]() The
following fields are view only:
Street Address, City, State, Phone Number, and School District IU #.
The
following fields are view only:
Street Address, City, State, Phone Number, and School District IU #.
To add School Information
The add School Information function allows users to add School Information associated with an Admission.
1. Enter the Following:
|
School Grade Level |
12 |
|
School Name – District |
|
|
School Contact Name |
Barbara Moore |
2. Click
![]()
![]() The School Info tab will list any School
Information for the patient associated with the Inquiry.
The School Info tab will list any School
Information for the patient associated with the Inquiry.
![]() If the desired school is not available,
contact your supervisor.
If the desired school is not available,
contact your supervisor.
To edit School Information
The Edit School Information function allows users to edit School Information associated with an Admission.
1. Click in the School Contact Name field
2. Change the Following:
|
School Contact Name |
Barbara Mauer |
3. Click
![]()
|
|
Episode Payor Ranking |

The Payors tab allows users to view a summary of the Payor Ranking associated with an Admission. From this summary view, a user can view, edit or create Payor Rankings.
To view and edit Episode Payor Information
The View Payor Information function allows users to view and edit Payor Rankings associated with an Admission.
1. Click on the Payors tab
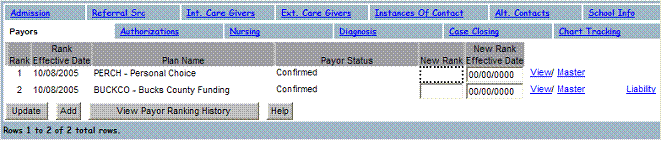
2. Change the Following:
|
New Rank |
2 |
|
New Rank Effective Date |
10/01/2005 |
3. Click ![]()
![]() The New Rank and New Rank Effective Date
fields are required. All other fields are read only.
The New Rank and New Rank Effective Date
fields are required. All other fields are read only.
![]() When re-ranking episode payors with a New Rank
Effective date that is on or before the current date, all payors must be
re-ranked with the same New Rank Effective Date (no exceptions).
When re-ranking episode payors with a New Rank
Effective date that is on or before the current date, all payors must be
re-ranked with the same New Rank Effective Date (no exceptions).
![]() No rank, except for 99, can be duplicated.
No rank, except for 99, can be duplicated.
![]() There must always be a rank 1 payor.
There must always be a rank 1 payor.
![]() A New Rank Effective Date that is the
current date or earlier applies the change immediately. These rank changes are
applied to charges associated with the episode.
A New Rank Effective Date that is the
current date or earlier applies the change immediately. These rank changes are
applied to charges associated with the episode.
![]() A New Rank Effective Date in the future
will update the payor ranking automatically the night before that date.
A New Rank Effective Date in the future
will update the payor ranking automatically the night before that date.
![]() A New Rank can not be set to anything other
than 99 when the master payor has a rank of 99.
A New Rank can not be set to anything other
than 99 when the master payor has a rank of 99.
To create Payor Information
The Create Payor Information function allows users to view and/or update Episode Payor Information associated with an Admission.
1. Select
![]()
2. Click the Add link next to the desired Payor
3. Click
![]()
![]() The Payor and Rank fields are required
and the Payor Status field is view only and will default to 'Pending'.
The Payor and Rank fields are required
and the Payor Status field is view only and will default to 'Pending'.
![]() Only Payors listed on the Master Payor List
(Client Record) with a status of ‘Confirmed’ and Benefit Effective and
Expiration Dates valid for the admission will be able to be selected from the
drop down menu in the Payor Plan field.
Only Payors listed on the Master Payor List
(Client Record) with a status of ‘Confirmed’ and Benefit Effective and
Expiration Dates valid for the admission will be able to be selected from the
drop down menu in the Payor Plan field.
![]() Rank, Current Rank Effective Date, New
Rank, and New Rank Effective Date are set to NULL. All other fields from master
payor are copied to the episode payor.
Rank, Current Rank Effective Date, New
Rank, and New Rank Effective Date are set to NULL. All other fields from master
payor are copied to the episode payor.
To delete Payor Information
Only payors with no values set for the Rank, Rank Effective Date, New Rank, and New Rank Effective Date fields can be deleted.
1. Click the Delete link next to the desired Payor
2. Click
![]()
![]() If a payor is no longer valid, the rank should
be changed to ‘99’.
If a payor is no longer valid, the rank should
be changed to ‘99’.
![]() If
this Payor has Authorizations associated with it, then the user is prompted to
choose another Payor to which the Authorizations will be linked. Any Authorizations, Review Instances,
Utilization Review information, and Appeals become linked to the newly selected
Payor. If the user does not select
another Payor to replace the 99 ranked Payor, then all Authorizations, Review Instances, Utilization Review
information, and Appeals are no longer available.
If
this Payor has Authorizations associated with it, then the user is prompted to
choose another Payor to which the Authorizations will be linked. Any Authorizations, Review Instances,
Utilization Review information, and Appeals become linked to the newly selected
Payor. If the user does not select
another Payor to replace the 99 ranked Payor, then all Authorizations, Review Instances, Utilization Review
information, and Appeals are no longer available.
To Add a liability to an Episode Payor
Only payors with that are
1. Click the Liability link next to the desired Payor

2. Click
![]()
3. Select a Liability from the selected list. Only liabilities entered on the main liability screen will be displayed in this list.

4. Click
![]()
To Edit a liability
1. Click the Liability link next to the desired Payor
2. Click on the Edit Link next to the liability to edit.
3. Select a new Liability from the selected list. Only liabilities entered on the main liability screen will be displayed in this list.
4. Click
![]()
To Delete a liability
5. Click the Liability link next to the desired Payor
6. Click on the Delete Link next to the liability to edit.

7. Click
![]()
|
|
Authorizations |
The Authorizations tab allows users to view a summary of all Authorizations associated with an Admission. From this summary view, a user can create, view, and edit Authorizations for an Admission.
To view Authorizations
The View Authorizations function allows users to view Authorizations associated with an Admission.
1. Click on the Authorizations tab
![]() The list can be sorted by All, Current or
History
The list can be sorted by All, Current or
History
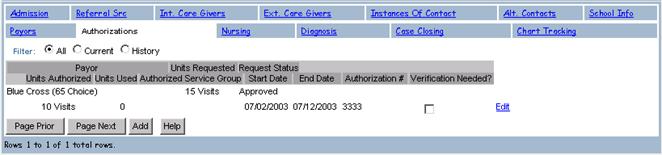
To create an Episode Authorization
The Create Episode Authorization function allows users to create a new Authorization associated with an Admission record.
![]() If an Authorization was received prior to the
patient’s Admission, the Authorization can be documented using the
Authorization tab on the Inquiry screen.
If an Authorization was received prior to the
patient’s Admission, the Authorization can be documented using the
Authorization tab on the Inquiry screen.
1.
Click ![]()
2.
Select Blue Cross (65 Choice)
3.
Enter the Following:
|
Reviewer Name |
Bob Psychologist |
|
Reviewer Organization |
Value Behavioral Health |
4.
Click ![]()
![]() The Payor field is a required
field. If the Payor exists in the
Utilization Review Info table then the system will default to the Reviewer
Name, Review Organization, Reviewer Phone No. and Phone Extension.
The Payor field is a required
field. If the Payor exists in the
Utilization Review Info table then the system will default to the Reviewer
Name, Review Organization, Reviewer Phone No. and Phone Extension.
![]() The system will default to the unchecked
Status of "No" for the Verification Needed checkbox.
The system will default to the unchecked
Status of "No" for the Verification Needed checkbox.
To edit an Episode Authorization
The Edit Episode Authorization function allows users to edit an existing Authorization for an Admission in the system.
1. Click on the Edit link next to the Newly Created Authorization
2. Select Blue Cross (65 Choice)
3. Enter the Following:
|
Next Review Date |
1 Week From Today’s Date |
|
Phone Number |
610-555-9999 (no dashes) |
|
Quantity |
10 |
|
Units |
Days |
|
Status |
Pending |
|
Status Date |
Today’s Date |
4.
Click Update
To view Authorization activity
The View Authorization activity function allows users to view Authorization activity associated with an Admission.
1.
Click on the Edit link next to the
Newly Created Authorization
2.
Click View Activity
3.
Click ![]() to Close the Authorization
Activity browser window
to Close the Authorization
Activity browser window
4.
Click ![]()
|
|
Nursing |

The Nursing tab allows users to view and/or update Nursing information associated with an Admission record.
To view Nursing activity
The View Nursing Activity function allows users to view Nursing activity associated with an Admission.
1. Click on the Nursing tab
![]() Selecting the Nursing tab from the Patient
Tracking menu will also access Nursing Activity.
Selecting the Nursing tab from the Patient
Tracking menu will also access Nursing Activity.
To add Nursing activity
The Add Nursing Activity function allows users to add Nursing activity associated with an Admission.
1. Click on the Nursing tab
2. Enter the Following:
|
Assigned Hospital Room |
337B(West Unit) |
|
Commit Code |
Voluntary |
|
Projected Discharge Date |
8/30/2003 |
|
Meal Code |
Rstrctd To Unit |
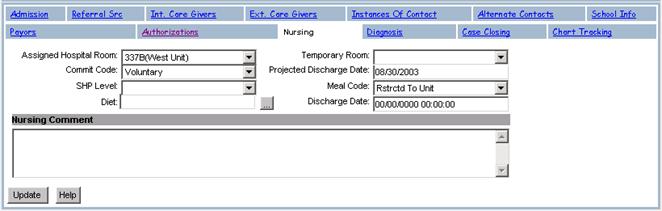
3. Click
![]()
To update Nursing activity
The Update Nursing Activity function allows users to update Nursing activity associated with an Admission.
1.
Click on the Nursing tab
2.
Change the Following:
|
Nursing Comment |
Gave Patient Their Medication |
3.
Click Update
|
|
Diagnosis |
The Diagnosis tab allows users to view and/or update a
Diagnosis associated with an Admission record.
To view a Diagnosis
The View Diagnosis function allows users to view a Diagnosis associated with an Admission.
1. Click on the Diagnosis tab
To add a Diagnosis
The Add Diagnosis function allows users to add a Diagnosis associated with an Admission.
1. Click on the Diagnosis tab
2. Enter the Following:
|
Diagnosis Status |
Admission |
|
IA |
290.0 – Senile Dementia |
|
IIA |
301.20 – Schizoid Personality Disorder |
|
IIIA |
401.9 – Hypertension |
|
Admission |
18 - Some Danger Of Hurting Self Or Others |
3. Click
![]()
![]() The Diagnosis Status identifies the type
as the Admission, Preliminary or Discharge Diagnosis.
The Diagnosis Status identifies the type
as the Admission, Preliminary or Discharge Diagnosis.
![]() The staff evaluator establishes the “Admission”
Status. The “Preliminary” Status is determined by the attending
psychologist and once a Discharge Diagnosis is entered in Axis V, Medical
Records assigns a Diagnosis Status as “Discharge”.
The staff evaluator establishes the “Admission”
Status. The “Preliminary” Status is determined by the attending
psychologist and once a Discharge Diagnosis is entered in Axis V, Medical
Records assigns a Diagnosis Status as “Discharge”.
![]() Axis I is the Preliminary or Drug and
Alcohol/Psychiatric Diagnosis. (It is the only Diagnosis required for an
Outpatient discharge).
Axis I is the Preliminary or Drug and
Alcohol/Psychiatric Diagnosis. (It is the only Diagnosis required for an
Outpatient discharge).
Axis II is the Personality Diagnosis and Mental Retardation.
Axis III is the Medical Diagnosis.
Axis IV lists the Psychosocial and Environmental stressors.
Axis V identifies the GAF. (Global Assessment of Functioning scale) and also contains the Admission and Discharge Diagnosis.
To update a Diagnosis
The Update Diagnosis function allows users to update an existing Diagnosis associated with an Admission.
1. Click on the Diagnosis tab
2. Under Axis V, Select the Following:
|
Admission |
82 – Absent or Minimal Symptoms |
3. Click Update
|
|
Case Closing |
The Case Closing tab allows users to view and/or update Case Closing data associated with an Admission record. In addition, the Case Closing tab allows users to maintain the Discharge Medications for the Admission.
To view Case Closing data
The View Case Closing function allows users to view a Case Closing associated with an Admission.
1. Click on the Case Closing tab
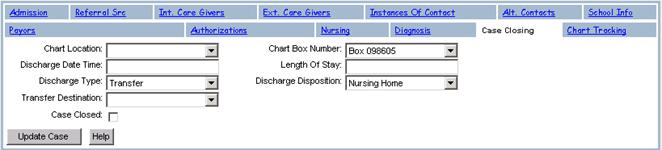
To add Case Closing data
The Case Closing function allows users to add Case Closing data associated with an Admission.
1. Click on the Case Closing tab
2. Enter the Following:
|
Discharge Type |
Transfer |
|
Chart Box Number |
|
|
Discharge Disposition |
Nursing Home |
3. Click Update Case
![]() The Case Closed checkbox will default to
Unchecked which indicates that "No" the case not closed. If the user (Medical Records staff) checks
the Case Closed checkbox, the record will be updated ONLY if the
following conditions have been met: A) a
Diagnosis record with a Diagnosis Status of 'Discharge' exists; and B) the
Discharge Date and Chart Location fields contain information. If these conditions are satisfied, the Update
Case process is allowed and the Episode Status is set to 'Closed'.
The Case Closed checkbox will default to
Unchecked which indicates that "No" the case not closed. If the user (Medical Records staff) checks
the Case Closed checkbox, the record will be updated ONLY if the
following conditions have been met: A) a
Diagnosis record with a Diagnosis Status of 'Discharge' exists; and B) the
Discharge Date and Chart Location fields contain information. If these conditions are satisfied, the Update
Case process is allowed and the Episode Status is set to 'Closed'.
|
|
Discharge Medications |
To View Discharge Medications summary
The View Discharge Medications Summary function allows users
to view a list of Discharge Medications for a discharged patient.
Discharge Medications appear below the Case Closing data.
To add Discharge Medication
The Add Discharge Medication function allows users to add a new Discharge Medication to an Admission record.
1. Click
![]()
2. Enter the Following:
|
Drug Name Strength |
Paxil 10mg |
|
Directions |
Take 1 Every Day |
|
Quantity |
30 |
|
Refills |
1 |
|
Internally Prescribed |
|

![]() The following fields are required: Drug Name Strength, Directions, Quantity and
Refills.
The following fields are required: Drug Name Strength, Directions, Quantity and
Refills.
3. Click
![]()
To update Discharge Medication
The Update Discharge Medication function allows users to update an existing Discharge Medication associated with an Admission record.
1.
Click on the Case Closing tab
2.
Click on the Newly Created Discharge
Medication
3.
Enter the Following:
|
Refills |
1 |
4. Click
![]()
To delete Discharge Medication
The Delete Discharge Medication function allows users to delete an existing Discharge Medication associated with an Admission record.
1.
Click on the Case Closing tab
2. Click on the Newly created Discharge Medication
3. Click
![]()
|
|
Chart Tracking |
The Chart Tracking tab allows Medical Records to view a list of forms comprising the contents of the chart associated with an Admission record.
To view a chart
The View Chart Tracking function allows users to view a list of forms comprising the contents of the chart associated with an Admission record.
1. Click on the Chart Tracking tab
To create a chart form
The Create Chart Form function allows users to create tracking data for a form being tracked for the chart associated with an Admission record.
1. Click on the Chart Tracking tab
2. Click
![]()
3. Enter the Following:
|
Form Name |
Admission Face Sheet |
|
Due |
9/30/2003 |
|
Received |
9/15/2003 |
|
Complete |
|

![]() The Form Name field is a required
field.
The Form Name field is a required
field.
![]() When the checkbox for Form Completed field is
unchecked, this means that “No” the form is not Completed. The system will default to unchecked.
When the checkbox for Form Completed field is
unchecked, this means that “No” the form is not Completed. The system will default to unchecked.
4. Click
![]()
To edit a chart form
The Edit Chart Form function allows users to edit tracking data for an existing form being tracked for the chart.
1. Click on the Chart Tracking tab
2. Click on the Newly Created Chart Tracking form
3. Change the Following:
|
Due |
9/25/2003 |
4. Click
![]()
To delete a chart form
The Delete Chart Form function allows users to delete tracking data for a form being tracked for the patient chart.
1. Click on the Chart Tracking tab
2. Click in the Newly Created Chart Tracking form
3. Click
![]()
4. Click Client Record from the Patient Tracking menu to return to Client Record main screen
Accessing Admission records
The Patient Tracking menu offers three ways to navigate to an Admission in Epitomax. The first method is to perform a Client Search and select an Admission from the Client Record Episode History tab. A second method is to utilize the Medical Records Work List. The third method is to utilize the Nursing Team Work List through the Nursing menu.
|
|
Medical Records Work List |

To access Admission records using the Medical Records work list
The Medical Records Work List function provides a means for Medical Records personnel to obtain a list of patient charts.
1. Click on the Medical Records menu item from the Patient Tracking menu
2. Enter the Following:
|
Admit Date Between |
3 Months prior to Today And Today’s Date |
|
Type Of Care |
Partial |
|
Program |
All |
3. Click
![]()
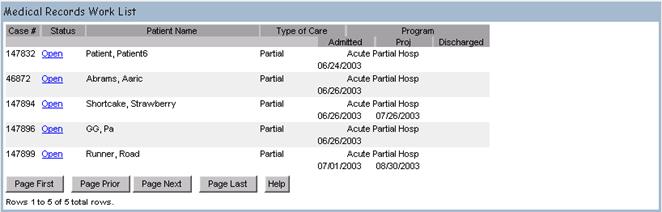
![]() Medical Records Work List results screen is
displayed.
Medical Records Work List results screen is
displayed.
4. Click on the Status Link to Open the Admission Record
![]() Admission record opens to the Diagnosis
tab
Admission record opens to the Diagnosis
tab
|
|
Nursing Team Work List |

To obtain a list of patients from the Nursing team work list
The Nursing Team Work List function provides a means for Nursing staff to obtain a list of patients to view or update Admission records.
1. Click on the Nursing menu item from the Patient Tracking menu
2. Enter the Following:
|
Unit |
East Unit |
|
Program |
All |
3. Click
![]()
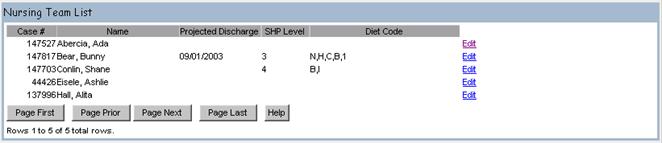
![]() The system displays the Nursing
information for the associated Admission when the Edit link is selected.
The system displays the Nursing
information for the associated Admission when the Edit link is selected.
|
|
Lesson 6
|
|
Utilization Management |
This section describes how to access and maintain Utilization Management records. Utilization Management in Epitomax contains all information regarding Authorizations, Case Reviews with insurance companies, and Appeals for payments denied. This information is maintained on an Admission-Payor basis. For each Payor defined in an Admission’s Payor Ranking, Utilization Management data may be maintained.
Accessing Utilization Management Records
The Patient Tracking menu offers two ways to navigate to Utilization Management in Epitomax. The first method is to open an Admission record for a patient and click on the Utilization Management menu item from the Patient Tracking menu. The second method is to utilize the Utilization Management Worklist.
To create a list of Utilization Management cases
The Utilization Management Work List function allows users to create a list of Utilization Management cases that require attention.
1. Click on the U/M Work List menu item found in the Patient Tracking menu
2. Enter the Following:
|
Next Review Date Between |
Leave Blank |
|
Type Of Care |
Partial |
|
Payor |
All |

3. Click
![]()
To view a Utilization Management record
The View Utilization Management Work List function allows users to view Utilization Management records.
1. Click the Case # of Your Patient to view the Utilization Management record
![]() The
list can be filtered by All, Current and History
The
list can be filtered by All, Current and History

![]() Information on Review Instances,
Authorizations and Appeals can be accessed here.
Information on Review Instances,
Authorizations and Appeals can be accessed here.
To view a list of Utilization Review companies
The View Utilization Review Company function allows users to view a list of Utilization Review companies or organizations.
1. Click on the Utilization Review Company link

![]() Only one Utilization Review Company can be
associated with a Payor record.
Only one Utilization Review Company can be
associated with a Payor record.
![]() From this screen shown above, the user is able
to add or edit an existing Utilization Review Company or Organization.
From this screen shown above, the user is able
to add or edit an existing Utilization Review Company or Organization.
To create a Utilization Review
The Create Utilization Review Company function allows users to create a new Utilization Review Company associated with a Payor record.
1. Click Add
2. Enter the Following:
|
Review Organization |
Valutrac |
|
Effective Date of Sub Acute Rate |
11/15/2003 |
|
Reviewer Name |
Bert Psychologist |
|
Reviewer Phone No |
610-999-9993 (no dashes) |
|
Reviewer Phone Extension |
2153 |
![]() The Review Organization field is a required
field.
The Review Organization field is a required
field.
3. Click
![]()
To edit a Utilization Review
The Edit Utilization Review Company function allows users to edit an existing Utilization Review Company for a Payor associated with the Admission.
1. Click the Edit link next to the Newly Created Utilization Review Company (Organization)
2. Change the Following:
|
Reviewer Phone Extension |
2176 |
3. Click
![]()
![]() Review Instances, Authorizations and Appeals
can be accessed here.
Review Instances, Authorizations and Appeals
can be accessed here.
|
|
Review Instances |

The Review Instances tab allows users to view a summary of all Review Instances associated with a Payor. From this summary view, a user may add new Review Instances or edit existing Review Instances.
To view Review Instances
1. Click on the U/M Work List menu item found from the Patient Tracking menu
2. Enter the Following:
|
Next Review Date Between |
8/1/2003 And 8/1/2003 |
|
Type Of Care |
Inpatient |
|
Program |
Inpt-Behavioral Evaluation |
|
Include Patients With No Authorizations |
|
3. Click
![]() ,
leaving the default criteria
,
leaving the default criteria
4. Select your patient by clicking on the case # link
To add a Review Instance
The Add Review Instance function allows users to add a new Review Instance associated with a Payor Ranking record.
1.
Click the Review Instances link
2.
Click ![]()
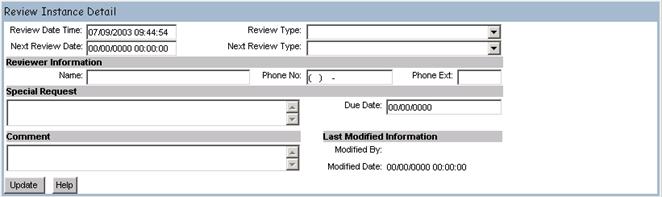
3.
Enter the Following:
|
Review Date Time |
Today’s Date |
|
Next Review Date |
10/15/2003 |
|
Review Type |
|
|
Next Review Type |
Doc – Doc, Level 1 |
|
Name |
Abby Psychiatrist |
|
Phone No |
610-888-5412 (no dashes) |
|
Phone Ext |
7695 |
|
Special Request |
Patient Needs More Psych Tests |
4. Click
![]()
To edit a Review Instance
The Edit Review Instance function allows users to edit an existing Review Instance for a Payor associated with the Admission.
1. Click the Edit link next to the Newly Created Review Instance
2. Change the Following:
|
Phone Ext |
7824 |
3. Click
![]()
4. Click Comments History to view the list of comments
5. Click
![]() on the Review Instance History
browser window
on the Review Instance History
browser window
|
|
Authorizations |

The Authorizations tab allows users to view a summary of all Authorizations associated with a Payor. From this summary view, a user may create new Authorizations or edit existing Authorizations.
To view Authorizations
1. Click the Authorizations link
![]() Authorizations can be filtered by All, Current
or History
Authorizations can be filtered by All, Current
or History
To add an Authorization
The Add Authorization function allows users to add a new Authorization associated with a Payor record.
1. Click on the Authorizations link
2. Click
![]()
3. Enter the Following:
|
Quantity |
1 |
|
Units |
Visit |
|
Status |
Approved |
|
Status Date |
11/15/2003 |
|
Start Date |
11/30/2003 |
|
Quantity Authorized |
1 |
|
Units |
Visit |
|
End Date |
12/15/2003 |
|
Authorized Service Group |
Ind. Therapy Only |
|
Authorization # |
3333 |
5. Click ![]()
To edit an Authorization
The Edit Authorization function allows users to edit an existing request and Authorization for a Payor associated with the Admission.
1.
Click the Edit link next to the Newly
Created Authorization
2.
Change the Following:
|
Quantity Authorized |
7 |
3.
Click ![]()
|
|
Appeals |

To view an appeal
The View Appeal Summary function allows users to view a summary of all Appeals associated with a Payor.
1. Click the Appeals tab
To create an appeal
The Create Appeal function allows users to create a new appeal associated with a Payor record.
1. Click the Appeals tab
2. Click
![]()
3. Enter the Following:
|
Appeal Status |
In Progress |
|
Appeal Type |
Financial |
|
Appeal Reason |
Disputing Bill |
4. Click
![]()
To edit an appeal
The Edit Appeal function allows users to edit an existing appeal for a Payor associated with the Admission.
1.
Click the Edit link next to the Appeal
2.
Change the Following:
|
Comment |
Chart Request By Reviewer |
3.
Click ![]()
To generate an appeal letter
A user may generate an Appeal Letter for an existing appeal record from the Edit Appeal function.
1. Click the Edit link next to the Newly Created Appeal
2. Click Appeal Letter
3. Close the Appeal Letter browser window
4. Click the Patient Case # to display the main Client Record window
![]() The letter template is displayed in Rich Text
Format (RTF). The letter will contain
the following fields: Review
Organization, Review Organization Street Address,
The letter template is displayed in Rich Text
Format (RTF). The letter will contain
the following fields: Review
Organization, Review Organization Street Address,
|
Lesson 7
|
Scheduling |
The Appointment Scheduling components of Epitomax allow a user to search for available appointment times in the system. Available appointment times are defined for each clinical staff using a Staff Schedule Profile.
|
|
View Staff Schedule |

Epitomax allows users to view a Staff’s scheduled activities for a single Day, for a Week, or for a Month at a time.
To view Staff Daily Schedule
The View Staff Daily Schedule function allows users to view a staff person's scheduled activities for a given Date.
1. Click on the View Staff Schedule menu item from the Scheduling menu
2. Enter the Following:
|
Staff Person |
Your Staff Person |
|
Date |
Today’s Date |
3. Click
![]()
The Staff’s Daily Schedule Is Displayed
![]() The Staff Person and Date fields are required
fields.
The Staff Person and Date fields are required
fields.
![]() These fields are all view only.
These fields are all view only.
![]() Only scheduled activities with a Status of
either ‘Pending’ or ‘Complete’ are displayed.
Only scheduled activities with a Status of
either ‘Pending’ or ‘Complete’ are displayed.
![]() The View Staff Daily function also displays
available time with the following fields: Start Time, End Time, Activity Class
Description and Location.
The View Staff Daily function also displays
available time with the following fields: Start Time, End Time, Activity Class
Description and Location.
![]() Three separate background colors are used to
differentiate scheduled activity, available time and unavailable time. A legend is displayed indicating which color
is used for each. The background color
is applied to the entire block of time that an activity spans.
Three separate background colors are used to
differentiate scheduled activity, available time and unavailable time. A legend is displayed indicating which color
is used for each. The background color
is applied to the entire block of time that an activity spans.
To view Staff Weekly Schedule
The View Staff Weekly Schedule function allows users to view a staff’s scheduled activities for the Week of a specified date.
1. Click on the Week tab
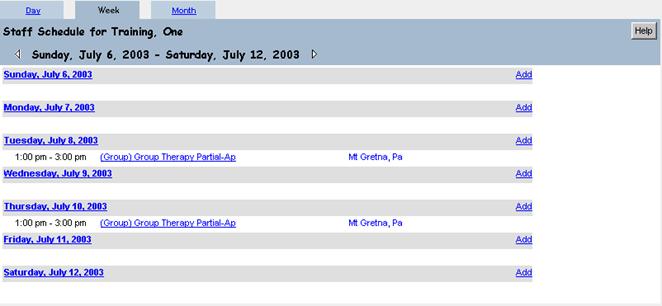
To view Staff Monthly Schedule
The View Staff Monthly Schedule function allows users to view a staff person's scheduled activities for the Month of a specified date.
1. Click on the Month tab
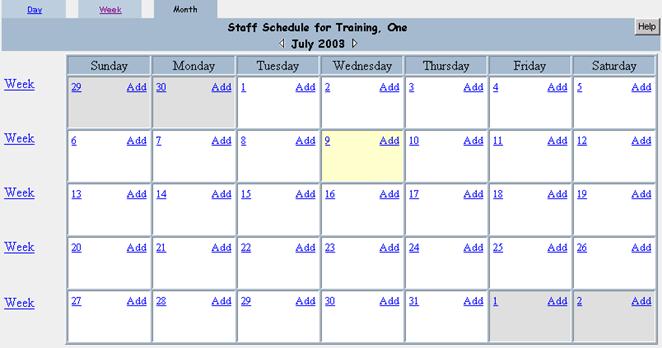
To access a day within the month
1. Click the link for the Day of Your Choice
2. Click the Month tab to return to the month view
|
View Location Schedule |

Epitomax allows users to view a Locations scheduled activities.
To view Location Schedule
The View Location Daily Schedule allows users to View Scheduled activities for all staff at a location on a given date.
1. Click on the View Location Schedule menu item from the Scheduling menu
2. Enter the Following:
|
Location |
Use the drop-down box to pick the appropriate location |
|
Date |
Today’s Date |
3. Click
![]()

|

To Schedule a New Client/Existing Client Appointment Using Schedule Appointment Link
Once a new client is created in Epitomax, the user can create an appointment utilizing the Schedule Appointment link under the Scheduling menu.
Alert: This Feature Of Epitomax Will Mainly Be Used By Central Scheduling To Find All Available Outpatient Appointments for Multiple Locations.
- After the initial Client Record is created, click on the Schedule Appointment link under the Scheduling menu.
- If the new client is
not auto-filled, click on
 button and type in the last name of the new client in the
Last Name Field.
button and type in the last name of the new client in the
Last Name Field. - Click
 .
. - Click on the Case Number Link of the new client.
- Choose either the Inquiry Episode or the correct Admission Episode if already created.
- Of the available fields under General, Staff Preferences and Client Availability, choose criteria in order to narrow down the available appointments.
![]() The Number of Bookings is displayed in
parenthesis beside a staff person's name for staff that allow multiple bookings
and for whom other Appointments have been scheduled.
The Number of Bookings is displayed in
parenthesis beside a staff person's name for staff that allow multiple bookings
and for whom other Appointments have been scheduled.
![]() If a Program is specified, then the search retrieves
only staff available time when the activity and/or the location is related to
the Program. If staff available times
exist that have no activity and no location, those available times are also
returned in the results.
If a Program is specified, then the search retrieves
only staff available time when the activity and/or the location is related to
the Program. If staff available times
exist that have no activity and no location, those available times are also
returned in the results.
![]() If any hospital Location is specified, then
the search retrieves only staff available time where the activity is related to
Programs that are related to the location entered. If staff available times
exist that have no activity and have no location, then those available times
are returned in the results addition to those matching the location criteria.
If any hospital Location is specified, then
the search retrieves only staff available time where the activity is related to
Programs that are related to the location entered. If staff available times
exist that have no activity and have no location, then those available times
are returned in the results addition to those matching the location criteria.
![]() If an Activity Code is selected, then the
system displays only staff available time where the Activity Class matches the
Activity Code or where the staff person’s discipline is the selected activity.
If an Activity Code is selected, then the
system displays only staff available time where the Activity Class matches the
Activity Code or where the staff person’s discipline is the selected activity.
![]() If any insurance plans are specified, then the
search first verifies whether or not any of the selected insurance plans
require credentialing. For those
insurance plans that require staff to be credentialed, the search only
retrieves staff available time for staff that has valid credentialing for the
plan.
If any insurance plans are specified, then the
search first verifies whether or not any of the selected insurance plans
require credentialing. For those
insurance plans that require staff to be credentialed, the search only
retrieves staff available time for staff that has valid credentialing for the
plan.
![]() If a specific staff person, gender or staff
specialty is specified, then the search retrieves only staff available time for
any staff satisfying the criteria.
If a specific staff person, gender or staff
specialty is specified, then the search retrieves only staff available time for
any staff satisfying the criteria.
![]() If a staff discipline is specified, then the
search retrieves only staff available time for staff with the discipline
selected and where the Activity Class has activities based on the discipline.
If a staff discipline is specified, then the
search retrieves only staff available time for staff with the discipline
selected and where the Activity Class has activities based on the discipline.
![]() If no Available Date From is specified or
the Available Date From is less than the current system date, then the search
retrieves only staff available time for dates that fall on or after the current
system date.
If no Available Date From is specified or
the Available Date From is less than the current system date, then the search
retrieves only staff available time for dates that fall on or after the current
system date.
![]() If an available Date From is specified, then
the search retrieves only staff available time for dates that fall on or after
the selected date.
If an available Date From is specified, then
the search retrieves only staff available time for dates that fall on or after
the selected date.
![]() If an available Date To is specified, then the
search retrieves only staff available time for dates that fall on or before the
selected date. The search will ignore the specified Date To if it falls before
the current system date.
If an available Date To is specified, then the
search retrieves only staff available time for dates that fall on or before the
selected date. The search will ignore the specified Date To if it falls before
the current system date.
![]() If a day is checked and a Start Time is
specified, then the search retrieves only staff available time for dates that
fall on the specified day and where 1) the available Start Time is on or after
the specified Start Time, or 2) the available End Time is after the specified
Start Time.
If a day is checked and a Start Time is
specified, then the search retrieves only staff available time for dates that
fall on the specified day and where 1) the available Start Time is on or after
the specified Start Time, or 2) the available End Time is after the specified
Start Time.
![]() If a day is checked and an End Time is
specified, then the search retrieves only staff available time for dates that
fall on the specified day and where 1) the available End Time is on or before
the specified End Time, or 2) the available Start Time is before the specified
End Time.
If a day is checked and an End Time is
specified, then the search retrieves only staff available time for dates that
fall on the specified day and where 1) the available End Time is on or before
the specified End Time, or 2) the available Start Time is before the specified
End Time.
7.
Click ![]()
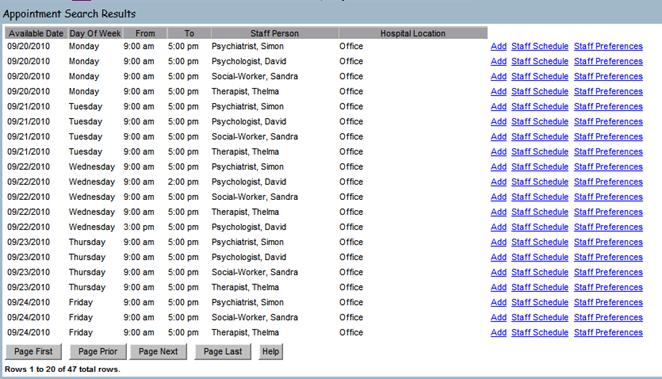
- Peruse the days,
times and staff available.
9. Click the Add link next to Your Staff Person
10. Enter the Following:
|
Start Time |
Defaults to the earliest available time for the chosen staff person and day – the user can change the start time remembering Epitomax uses military time |
|
Duration |
Using the drop-down box |
|
Activity Code |
Using the drop-down box |
|
Program |
Using the drop-down box |
|
Comments |
Optional |
- Click on the
 button.
![]() Central Scheduling creates an Inquiry for all
New Outpatient Appointments.
Central Scheduling creates an Inquiry for all
New Outpatient Appointments.
![]() The following fields are required fields:
Activity Code, Start Time and Duration.
The following fields are required fields:
Activity Code, Start Time and Duration.
![]() The following fields are view only fields:
Activity Status, Staff Person, Activity Date and Location.
The following fields are view only fields:
Activity Status, Staff Person, Activity Date and Location.
![]() If the Start Time and End Time do not fall
within staff available time for the selected date, then the Appointment is not
created unless the staff person allows double bookings.
If the Start Time and End Time do not fall
within staff available time for the selected date, then the Appointment is not
created unless the staff person allows double bookings.
![]() If the staff person allows double bookings and
an Appointment is added at a time that overlaps another Appointment, the new
Appointment is created and the user is notified of the conflict.
If the staff person allows double bookings and
an Appointment is added at a time that overlaps another Appointment, the new
Appointment is created and the user is notified of the conflict.
To Schedule a New Client/Existing Client Appointment Using the Appointments Tab
- After the initial Client Record is created, click on the Appointments tab.
- Click on the
 button.
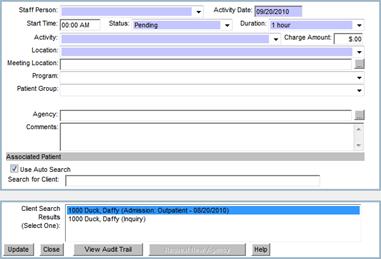
- Choose a staff person by using the drop-down box next to the Staff Person field.
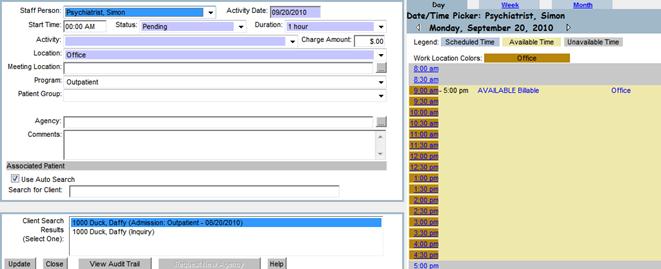
- Once a staff member has been chosen from the drop-down box, his or her schedule will appear on the right hand side of the screen, where the user can choose to view the chosen staff person’s schedule from a Daily view, Weekly view or Monthly view.
- Either manually input an activity date and time or click on a date and time to utilize the staff person’s calendar to select a date and time.
- Fill in the Duration, Activity, Program and any optional comments.
- Highlight the Episode (Inquiry or Admission) connected to the activity.
- Click .
- The window will close and the new appointment has been scheduled.
To Schedule a New Client/Existing Client Appointment Using the View Location Link
- After the initial Client Record is created in Epitomax, click on View Location Schedule link under the Scheduling menu.
- Choose the appropriate Location from the drop-down box and enter the correct Date.
- Click

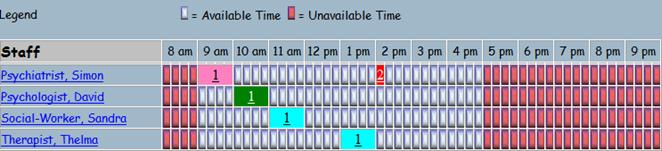
![]() Each hour on the display is divided
into 15-minute increments. Staff can select the first 15 minutes of the
hour, the second 15 minutes of the hour and so on, by clicking on one of the
four associated sections.
Each hour on the display is divided
into 15-minute increments. Staff can select the first 15 minutes of the
hour, the second 15 minutes of the hour and so on, by clicking on one of the
four associated sections.
![]() Colors for different Activities can be set by the system administrator
in Activity Maintenance under the Administration menu.
Colors for different Activities can be set by the system administrator
in Activity Maintenance under the Administration menu.
![]() The number
in the Appointment box is the number of scheduled appointments for that
time frame.
The number
in the Appointment box is the number of scheduled appointments for that
time frame.
![]() The
details of the Scheduled Appointment (name, time and activity) can be viewed
by hovering the cursor over the number.
The
details of the Scheduled Appointment (name, time and activity) can be viewed
by hovering the cursor over the number.
![]() If
staff selects a time slot labeled as unavailable, the system displays a message
indicating the time selected as unavailable and another time slot should be
selected.
If
staff selects a time slot labeled as unavailable, the system displays a message
indicating the time selected as unavailable and another time slot should be
selected.
4.
Click
on one of the blocks next to the correct staff member to open the Appointment
screen.

![]() The
Staff Person, Date, Time, Location will auto-fill; however each can be manually
changed by the user.
The
Staff Person, Date, Time, Location will auto-fill; however each can be manually
changed by the user.
![]() The
duration defaults to 1 hour and can be changed by the user.
The
duration defaults to 1 hour and can be changed by the user.
- Choose the correct activity using the
drop-down box next to Activity.
- Under Associated Patient, manually enter
either the full last name or the first few letters of the client’s last
name.
- Highlight the correct Client and Episode
under the Client Search
- Click
To Schedule a New Client Appointment/Existing Client Using the View Staff Schedule Link
- After the initial Client Record is created in Epitomax, click on View Staff Schedule link under the Scheduling menu.
- Choose the appropriate Staff Person from the drop-down box and enter the correct Date.
- Click
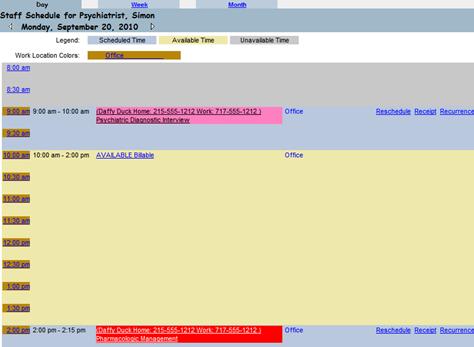
- Click on a Time link (10:00am, 1:00pm, etc.) to open an Appointment.
- Enter an Activity using the drop-down box
- Enter the last name or first few letters of the last name of the client
- Highlight the appropriate Client and Episode
- Click
To Modify an Existing Appointment for an Existing Client
The Modify Appointments function allows users
to modify
Appointments with regards to Canceling, Rescheduled, Pending, etc...
Alert: Modify Appointment Can Be Used To Identify Who A Patient Is Scheduled To See As Well As View Staff Schedule.
1. Click on the Modify Appointment link on the Scheduling main menu
2. Select Outpatient
3. Click ![]()
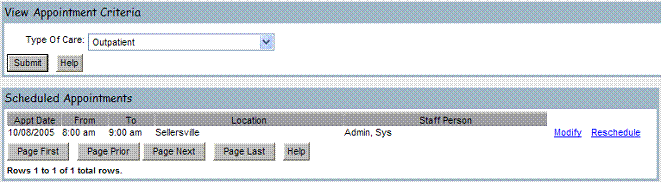
4. Click on the Modify link next to the first Appointment
5. Click ![]()
![]() The system will change the Appointment
both on the patient and staff records.
The system will change the Appointment
both on the patient and staff records.
![]() The Activity Status field is a required
field.
The Activity Status field is a required
field.
![]() The following fields are view only: Activity Code, Program, Staff Person,
Activity Date, Hospital Location, Start Time and End Time.
The following fields are view only: Activity Code, Program, Staff Person,
Activity Date, Hospital Location, Start Time and End Time.
![]() Status indicators are defined as follows:
Status indicators are defined as follows:
![]() Completed As Planned - To indicate
staff activity has been completed. Changes can be made as long as charges have
not been generated.
Completed As Planned - To indicate
staff activity has been completed. Changes can be made as long as charges have
not been generated.
![]() Completed With Changes - To
indicate staff activity has been completed and changes were made. Additional
changes can be made as long as charges have not yet been generated.
Completed With Changes - To
indicate staff activity has been completed and changes were made. Additional
changes can be made as long as charges have not yet been generated.
![]() Staff Cancelled -To indicate that a
staff has cancelled an Appointment. This option is available under staff
activity view.
Staff Cancelled -To indicate that a
staff has cancelled an Appointment. This option is available under staff
activity view.
![]() Patient Cancelled - To indicate that a staff has
cancelled an Appointment. This option is available under Associated Patients
view.
Patient Cancelled - To indicate that a staff has
cancelled an Appointment. This option is available under Associated Patients
view.
![]() No Show No Charge – To indicate a patient will not be
charged for an Appointment they did not attend.
No Show No Charge – To indicate a patient will not be
charged for an Appointment they did not attend.
![]() Rescheduled - To indicate that a
patient or staff has rescheduled an Appointment.
Rescheduled - To indicate that a
patient or staff has rescheduled an Appointment.
![]() Incorrect Entry – To indicate that an Appointment has
been incorrectly entered.
Incorrect Entry – To indicate that an Appointment has
been incorrectly entered.
![]() No Show – To indicate that a
patient did not show up for an appointment they were scheduled for, but are
responsible for charges incurred.
No Show – To indicate that a
patient did not show up for an appointment they were scheduled for, but are
responsible for charges incurred.
![]() Did Not Attend – To indicate staff
was not able to attend Appointment.
Did Not Attend – To indicate staff
was not able to attend Appointment.
![]() Unplanned Event - To indicate Appointment was unplanned but
still held.
Unplanned Event - To indicate Appointment was unplanned but
still held.
To Receipt a Existing Client including Scheduling Next Appointments
In Epitomax, you can receipt a co-pay and complete the appointment at the same time.
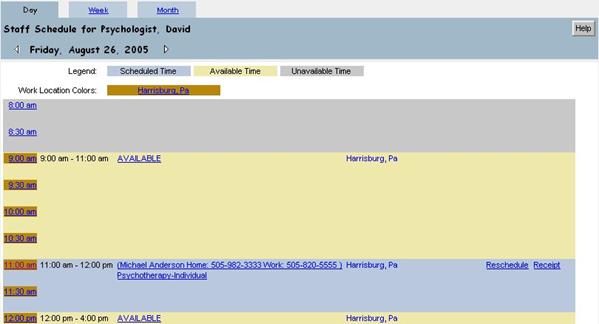
- Click on the Receipt link to the right of the appointment. The following page is displayed.
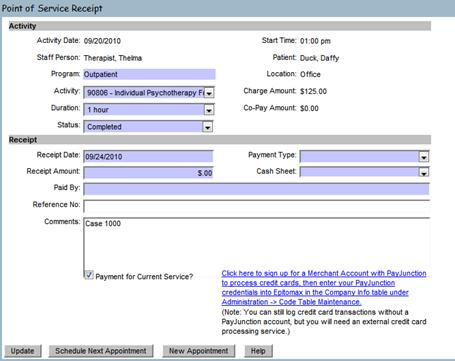
- Enter the following information:
|
Duration |
Duration of the appointment |
|
Status |
Completed |
|
Payment Type |
Check |
|
Receipt Amount |
$20 |
|
Cash Sheet |
Choose the correct cash sheet |
|
Payment for Current Service |
Check this box only if the payment is for this service only. |
- If another appointment is going to be scheduled with the same staff member, click on the Schedule Next Appointment button now. If a next appointment is scheduled it will print on the receipt.
- If another appointment is going to be scheduled with a different staff member, click on the New Appointment button, choose the staff member, date, time and activity. If an appointment is scheduled with another staff member, it will print on the receipt.
![]() If the payment received is for today’s
session only – the Payment for Current Service box must be
checked. This payment will
automatically apply against today’s service.
If the payment received is for today’s
session only – the Payment for Current Service box must be
checked. This payment will
automatically apply against today’s service.
![]() If payment received is for today’s session
and a previous session – the Payment for Current Service box must be
unchecked. It would be helpful if the
Comments would be entered indicating payment includes a previous session. This payment will be applied to the
appropriate services by non-clinical staff.
If payment received is for today’s session
and a previous session – the Payment for Current Service box must be
unchecked. It would be helpful if the
Comments would be entered indicating payment includes a previous session. This payment will be applied to the
appropriate services by non-clinical staff.
![]() If payment received is for a previous
session only – the Payment
for Current Service box must be unchecked.
It would be helpful if the Comments would be entered indicating payment
is for a previous session.
If payment received is for a previous
session only – the Payment
for Current Service box must be unchecked.
It would be helpful if the Comments would be entered indicating payment
is for a previous session.
To Reschedule an Appointment for an Existing Client
1. Click the Modify Appointment under the Scheduling main menu
2. Select a type of care
3. Click Submit
4. Click on the Reschedule link next to the Appointment
5. Select the new Date and Time by navigating through the staff schedule.
6. Once a new date and time have been selected click on the update button and the appointment will be rescheduled for that date and time
OR
1.
From the
staff’s daily schedule view, click on the Reschedule
link.
2.
Using
the daily, weekly or monthly view, find an available time and click on the hour
(2:00pm, 8:00am).
3.
Review
the Appointment information and click Update.
To Set a Recurring Appointment with an Existing Client
In Epitomax, it is possible to set up an appointment to recur into the future. It is possible to recur any individual-type appointment; groups will recur automatically.
- Upon completing the first appointment, view the staff’s daily schedule and click on the Recurrence link.
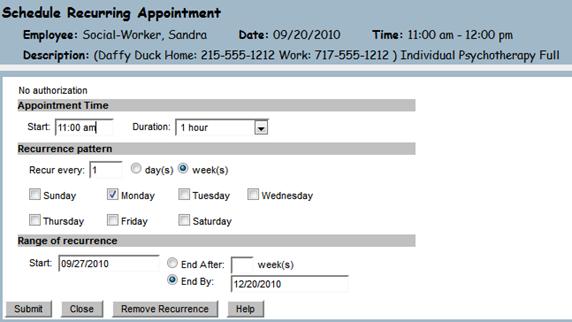
- Staff is able to change the Start Time, Duration, Recurrence Pattern and Number of Sessions or End Date.
![]() Staff
is unable to change the type of Activity.
Staff
is unable to change the type of Activity.
![]() It
is recommended that a recurrence not extend beyond 4 to 6 sessions.
It
is recommended that a recurrence not extend beyond 4 to 6 sessions.
- Click
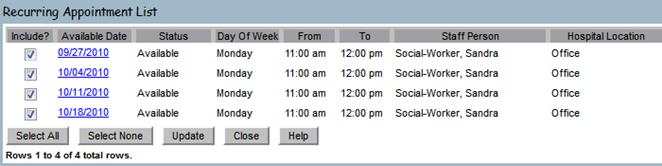
![]() If
a time or date is already booked or otherwise not available, the Status will
appear in RED and state Unavailable.
If
a time or date is already booked or otherwise not available, the Status will
appear in RED and state Unavailable.
![]() Staff
can choose to remove one of the occurrences by clicking the Include?
checkbox, making it inactive.
Staff
can choose to remove one of the occurrences by clicking the Include?
checkbox, making it inactive.
- Click
To Remove a Recurring Appointment with an Existing Client
- View the staff’s daily schedule and click on the Recurrence link.
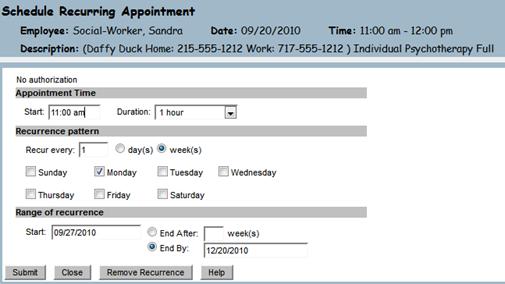
- Click on

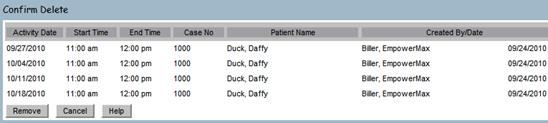
- Click

 Group
Scheduling
Group
Scheduling
To view patient Group Assignments
The View Patient Group Assignments function allows users to view recurring group activities associated with the selected patient Admission.
1. Click on Patient Groups Assignments menu item from the Scheduling menu

![]() The Patient Group Assignment menu item
will only be accessible after an Episode has been selected.
The Patient Group Assignment menu item
will only be accessible after an Episode has been selected.
To add a patient Group Assignment
The Add Patient Group Assignment function allows users to add the selected patient Admission to a group activity.
1.
Click Client Record
2.
Click Episode History
3.
Select Acute Partial Hosp Admission
4.
Click Patient Group Assignments from the Scheduling
menu
5.
Click ![]()
6. Select Group Therapy Partial-Ap, Mt Gretna, Pa,.…….

7. Click
![]()
![]() After the patient has been associated with the
group, the group is added to the patient’s schedule on the dates and times
defined by the group’s recurrence until discharged.
After the patient has been associated with the
group, the group is added to the patient’s schedule on the dates and times
defined by the group’s recurrence until discharged.
To remove a patient Group Assignment
The Remove Patient Group Assignment function allows users to remove a patient Admission associated to a group schedule profile.
Alert: For Training Purposes Do Not Remove Group Assignment
1. Click on the Remove link next to the first assignment
2. Click Confirm Delete
![]() Clicking the Confirm Delete button removes
the Patient from the group and removes all occurrences of the group from the
patient’s schedule (except for dates that occurred in the past) where the
Status of the activity for the patient is ‘Pending’.
Clicking the Confirm Delete button removes
the Patient from the group and removes all occurrences of the group from the
patient’s schedule (except for dates that occurred in the past) where the
Status of the activity for the patient is ‘Pending’.
To update Program Attendance Days
The Update Program Attendance Days function allows users to specify which days of the week a patient is to attend the Program to which they have been admitted.
- Click on the Program Attendance menu item from the Scheduling menu.

2. Select Tue, Thru
3. Click
![]()
|
Lesson 8
|
|
Service Activity |
Service Activity tracking in Epitomax is used to record all activities performed by Staff (both billable and non-billable activities). A day of Service Activity can be Completed after all activities have been resolved (i.e., Statuses set to something other than Pending) for that day. Once a day of activity is “Completed” for a Staff Person, then Charges for any billable services will be processed for billing purposes and the Completed day will be available for payroll processing.
To view incomplete Service Activity
The View Incomplete Service Activity function allows users to view a list of incomplete days of Service Activity for the selected staff person.
1. Click on the Service Activity Entry menu item from the Service Activity menu
2. Select the Staff Person from the Search box by using the Ellipsis
3.
Click ![]()
4.
Click ![]()

![]() The Incomplete Days summary screen is
displayed. This is the view screen for
the list of Service Activity entries that have not been “Completed” in the
system.
The Incomplete Days summary screen is
displayed. This is the view screen for
the list of Service Activity entries that have not been “Completed” in the
system.
![]() Clicking
Update completes the day for any date having the Complete the Day With No
Activity checkbox checked.
Clicking
Update completes the day for any date having the Complete the Day With No
Activity checkbox checked.
![]() The list of Incomplete Days includes all
records for the chosen staff between the current system date minus 100 days and
the current system date plus 21 days. It
also includes any Completed Days where Payroll and Charges have not been
generated.
The list of Incomplete Days includes all
records for the chosen staff between the current system date minus 100 days and
the current system date plus 21 days. It
also includes any Completed Days where Payroll and Charges have not been
generated.
![]() The Complete The Day With No Activity
checkbox only displays for days where the Total Hours column equals zero and
the activity date is less than or equal to the current date.
The Complete The Day With No Activity
checkbox only displays for days where the Total Hours column equals zero and
the activity date is less than or equal to the current date.
To add Service Activity-Benefit Time
The Add Service Activity function allows users to associate benefit time with the selected staff person and activity date.
1. Click an Incomplete Status date link
2. Click the Quick Add button

3. Enter the required information
a. Status of benefit time is “completed as planned”, even for future dates.
b. Duration -Entering the duration in minutes or searching for the number of hours by using the Ellipsis indicates duration.
c. Activity -Search for the Activity by using the Ellipsis or by entering the Activity code in the Activity field. Use the % to search in the search window
i.e. 9011 is the activity code for Vacation time
d. Location (defaults to staff’s primary location)
e. Program (defaults to staff’s primary program)
f. Primary Therapist (defaults to staff selected)
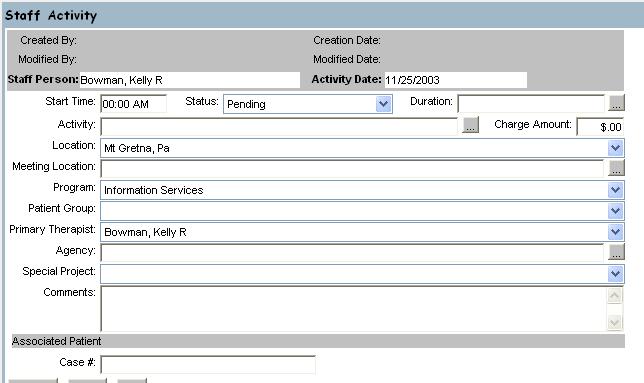
- Click Update
![]() If the code is a billable code, an Associated
Patient is required and the system will display the Client Search
screen. If you know the Case # of the associated client, enter it in the Case #
field at the bottom of the Staff activity screen.
If the code is a billable code, an Associated
Patient is required and the system will display the Client Search
screen. If you know the Case # of the associated client, enter it in the Case #
field at the bottom of the Staff activity screen.
![]() The following fields are required
fields: Status, Activity and Duration.
The following fields are required
fields: Status, Activity and Duration.
![]() The following fields are view only:
Staff Person and Activity Date.
The following fields are view only:
Staff Person and Activity Date.
![]() If the user does not enter a Charge
Amount, the system will attempt to assign a charge amount by using the highest
rate for the Staff's Discipline(s) and the Activity. If the system cannot find a charge for the
associated staff person, the default rate in the Activity table is used.
If the user does not enter a Charge
Amount, the system will attempt to assign a charge amount by using the highest
rate for the Staff's Discipline(s) and the Activity. If the system cannot find a charge for the
associated staff person, the default rate in the Activity table is used.
![]() The Total Hours and Completed Hours for
the Staff Person’s day are re-calculated when the new activity is saved.
The Total Hours and Completed Hours for
the Staff Person’s day are re-calculated when the new activity is saved.
![]() The End Time is computed by the system
based on the Start Time (if a time is entered) and the activity Duration.
The End Time is computed by the system
based on the Start Time (if a time is entered) and the activity Duration.
![]() If the Add Service Activity function is
accessed through the Scheduling function, the Start Time defaults to the time
selected on the Staff Schedule screen.
If the Add Service Activity function is
accessed through the Scheduling function, the Start Time defaults to the time
selected on the Staff Schedule screen.
To add Service Activity
The Add Service Activity function allows users to associate a new Service Activity record with the selected staff person and activity date.
5. Click an Incomplete Status link
6. Click
![]()
7. Enter the Following:
|
Start Time |
10:00 am |
|
Status |
Pending |
|
Duration |
1 Hour |
|
Activity |
90806 Psychotherapy-Individual |
|
Location |
|
|
Program |
Outpt-Mt. |
8. Click
![]()
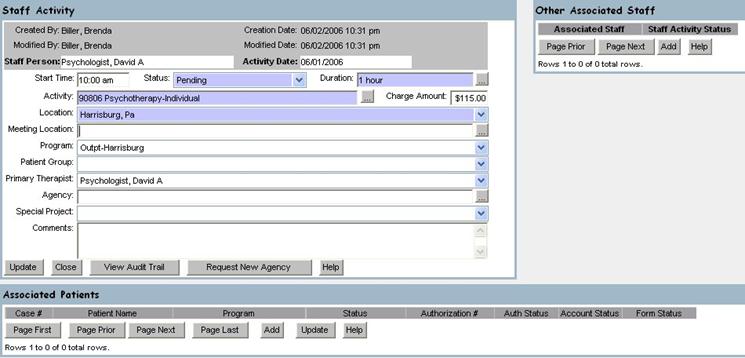
![]() If the code is a billable code, an Associated
Patient is required and the system will display the Client Search
screen.
If the code is a billable code, an Associated
Patient is required and the system will display the Client Search
screen.
![]() The following fields are required
fields: Status, Activity and Duration.
The following fields are required
fields: Status, Activity and Duration.
![]() The following fields are view only:
Staff Person, Activity Date and Primary Therapist.
The following fields are view only:
Staff Person, Activity Date and Primary Therapist.
![]() If the user does not enter a Charge
Amount, the system will attempt to assign a charge amount by using the highest
rate for the Staff's Discipline(s) and the Activity. If the system cannot find a charge for the
associated staff person, the default rate in the Activity table is used.
If the user does not enter a Charge
Amount, the system will attempt to assign a charge amount by using the highest
rate for the Staff's Discipline(s) and the Activity. If the system cannot find a charge for the
associated staff person, the default rate in the Activity table is used.
![]() The Total Hours and Completed Hours for
the Staff Person’s day are re-calculated when the new activity is saved.
The Total Hours and Completed Hours for
the Staff Person’s day are re-calculated when the new activity is saved.
![]() The End Time is computed by the system
based on the Start Time and the activity Duration.
The End Time is computed by the system
based on the Start Time and the activity Duration.
![]() The Program will default to the staff person’s
primary Program.
The Program will default to the staff person’s
primary Program.
![]() If the Add Service Activity function is
accessed from the View Staff Daily Schedule function, the Start Time defaults
to the time selected on the View Staff Daily Schedule screen.
If the Add Service Activity function is
accessed from the View Staff Daily Schedule function, the Start Time defaults
to the time selected on the View Staff Daily Schedule screen.
To add Service Activity for an Agency or EAP Company
1. Click Service Activity Entry
2. Enter the Following:
|
Staff Person |
Your Staff Person |
3. Click
![]()
4. Click an Incomplete Status link
5. Click
![]()
6. Enter the Following:
|
Start Time |
10:00 am |
|
Status |
Completed As Planned |
|
Duration |
4 Hours |
|
Activity |
20100 EAP Seminar |
|
Location |
Community Location-Unspecified |
|
Program |
Employee Assistance Program |
|
Primary Therapist |
Your Staff Member |
|
Agency |
B.R. Kreider & Son, (Eap) (Group No) |
7.
Click ![]()
To edit Service Activity
The Edit Service Activity function allows users to edit existing Service Activity records associated with the selected staff person and activity date.
1. Change the Following:
|
Start Time |
11:00 am |
![]() The following fields are required
fields: Status, Activity and Duration.
The following fields are required
fields: Status, Activity and Duration.
![]() The following fields are view only: Created By, Creation Date, Modified By,
Modified Date, Staff Person and Activity Date, Case #, Patient Name, Program,
Combined Case, Authorization Number, Associated Staff and Staff Activity
Status.
The following fields are view only: Created By, Creation Date, Modified By,
Modified Date, Staff Person and Activity Date, Case #, Patient Name, Program,
Combined Case, Authorization Number, Associated Staff and Staff Activity
Status.
![]() If the Status is being changed then a
value must also be set for the Program field.
If the Status is being changed then a
value must also be set for the Program field.
![]() The End Time is computed by the system,
based on the Start Time and the activity Duration.
The End Time is computed by the system,
based on the Start Time and the activity Duration.
![]() If the user changes the activity (Activity
Code), the system will re-assign the Authorization(s) for each Payor
Ranking associated with each Patient Activity record.
If the user changes the activity (Activity
Code), the system will re-assign the Authorization(s) for each Payor
Ranking associated with each Patient Activity record.
![]() If the Patient Activity Status is changed
from either 'Pending' or 'Complete' to any other Status, the system will
remove all Authorizations associated with the Patient Activity.
If the Patient Activity Status is changed
from either 'Pending' or 'Complete' to any other Status, the system will
remove all Authorizations associated with the Patient Activity.
![]() If the Patient Activity Status is changed
from any Status other than 'Pending' or 'Complete' to 'Pending' or 'Complete',
for each Payor associated with the Patient Activity an Authorization will be
assigned if a valid one exists.
If the Patient Activity Status is changed
from any Status other than 'Pending' or 'Complete' to 'Pending' or 'Complete',
for each Payor associated with the Patient Activity an Authorization will be
assigned if a valid one exists.
![]() You can now edit Service Activity after you
complete the day. You cannot
modify after charges or payroll has been generated. Once charges or payroll have been generated,
you must contact the Help Desk for additional corrections to be made.
You can now edit Service Activity after you
complete the day. You cannot
modify after charges or payroll has been generated. Once charges or payroll have been generated,
you must contact the Help Desk for additional corrections to be made.
![]() Benefit time can now be Completed
before the time is taken.
Benefit time can now be Completed
before the time is taken.
To associate a patient
The Add Patient Activity function allows users to associate a patient Admission to an activity record.
![]() The Client Search window will display
depending on the activity selection.
The Client Search window will display
depending on the activity selection.
1. Enter the Following:
|
Last Name |
Your Patient |
2. Click
![]()
3. Click on Your Patient’s Case #
4. Select the Outpt Mt.-Gretna Admission
5. Click
![]()
Note: To add other Associated Patients, do the following:
8.
Under the Associated Patients
heading, Click ![]()
9. Select the associated admission for the patient
10. Click
![]()

To associate another staff
The Associate Another Staff function allows users to associate another staff to the activity.
1. Click Add under the Other Associated Staff Heading
2. Type “Training” (for training purposes) in the Search For Items Containing text box
3. Click
![]()
4. Select the Next Training Number (for training purposes) Up From Yours
Alert: For Example, If You Are “Training, One” Then Select “Training, Two”
5. Click
![]()
6. Close the Staff Activity, Associated Patients, Other Associated Staff Window to return to Staff Daily Activity Entry
Completing the Day
![]() Make
sure all activities for the day have a status of Completed
Make
sure all activities for the day have a status of Completed
![]() You
will not be able to Complete the Day if any activity has a status of anything
other than completed.
You
will not be able to Complete the Day if any activity has a status of anything
other than completed.
![]() If
no activity occurred, check the check box “Complete the Day with No Activity”
and click on Update. This will complete the day with no activity.
If
no activity occurred, check the check box “Complete the Day with No Activity”
and click on Update. This will complete the day with no activity.
|
Patient Activity Inquiry |

To view Patient Activity
The View Patient Activity Inquiry function allows a user to view the selected patients scheduled Appointments.
1. Click Client Record
2. Click Patient Activity Inquiry from the Service Activity menu
3.
Enter the Following:
|
Episode |
Outpatient, Outpt-Mt. |
4.
Click ![]()
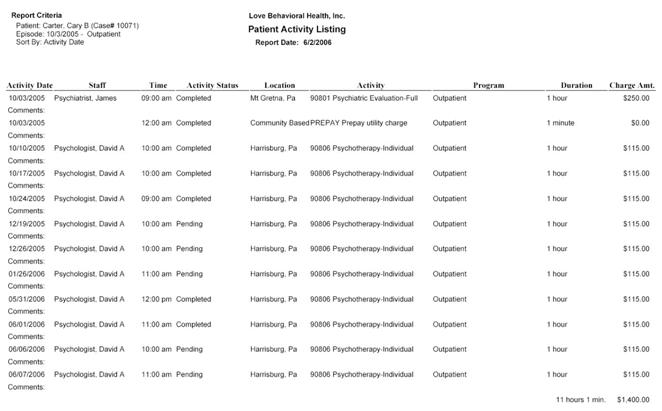
5.
In the Patient Activity Listing browser
window, Select File
6.
Click ![]()
|
|
Program Activity Completion |

The View Program Activity Completion function allows users to view a list of the routine Program based activity records for an Activity Date, Type Of Care, Program and Activity.
1. Click on the Program Activity Completion from the Service Activity main menu
2. Enter the Following:
|
Activity Date |
7/15/2003 |
|
Type Of Care |
Partial |
|
Program |
Acute Partial Hosp |
|
Activity |
4072 Routine Care-Acute Adult Partial Hosp |

3. Click
![]()

4. Click
![]()
5. Enter the Following:
|
Patient |
Your Patient |
|
Patient Activity Status |
Pending |
|
Duration |
6 Hours |
6.
Click ![]()
7.
Change the Following:
|
Status |
Completed
|
8.
Click ![]()
![]() A user is also able to access the following
functions: Create Program Activity function and the Edit Program Activity
function.
A user is also able to access the following
functions: Create Program Activity function and the Edit Program Activity
function.