 ®
®
Clinical
Training Manual


Welcome to Epitomax…..
Your Behavioral Health web-based system that
integrates Patient Tracking, Scheduling, Service Activity, Billing, Clinical,
and Accounts Receivable. This document includes a table of contents,
step-by-step processes on how to perform functional activities, graphic
screenshots illustrating program activities, notes, tips and special
conditions. This document is meant to assist you in your use of the clinical functionality
in Epitomax.


![]()
Table Of Contents
Service
Documentation
|
Service Activity tracking in Epitomax is used to record all
activities performed by Staff (both billable and non-billable activities). A
day of Service Activity can be Completed after all activities have been
resolved (i.e., Statuses set to something other than Pending) for that day.
Once a day of activity is “Completed” for a Staff Person, then Charges for any
billable services will be processed for billing purposes and the Completed day
will be available for payroll processing.
To view incomplete Service Activity
The View Incomplete Service Activity function allows users to
view a list of incomplete days of Service Activity for the selected staff
person.
1.
Click on the Service Activity Entry
menu item from the Service Activity menu
2.
Select the Staff Person from the
Search box by using the Ellipsis
3.
Click Ok
4.
Click Submit
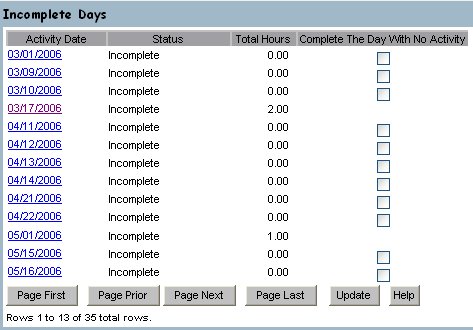
![]() The
Incomplete Days summary screen is displayed.
This is the view screen for the list of Service Activity entries that
have not been “Completed” or generated through Payroll in the system.
The
Incomplete Days summary screen is displayed.
This is the view screen for the list of Service Activity entries that
have not been “Completed” or generated through Payroll in the system.
![]() Clicking
Update completes the day for any date having the Complete the Day With No
Activity checkbox checked.
Clicking
Update completes the day for any date having the Complete the Day With No
Activity checkbox checked.
![]() The list of Incomplete Days includes all
records for the chosen staff between the last day charges were generated and
the current system date plus 21 days. It
may also include any Completed Days where Payroll and Charges have not been
generated.
The list of Incomplete Days includes all
records for the chosen staff between the last day charges were generated and
the current system date plus 21 days. It
may also include any Completed Days where Payroll and Charges have not been
generated.
![]() The Complete The Day With No Activity
checkbox only displays for days where the Total Hours column equals zero and
the activity date is less than or equal to the current date.
The Complete The Day With No Activity
checkbox only displays for days where the Total Hours column equals zero and
the activity date is less than or equal to the current date.
![]() Another way to get to an activity and
document it is using View Staff Activity on the Scheduling menu. Clicking on the activity in the staff
calendar is the same as doing step 6 below.
The rest of the lesson is the same from there.
Another way to get to an activity and
document it is using View Staff Activity on the Scheduling menu. Clicking on the activity in the staff
calendar is the same as doing step 6 below.
The rest of the lesson is the same from there.
5. Click
on an Activity Date to view or
modify the activities for that day.
![]() The Staff
Daily Activity Entry screen is displayed.
The Staff
Daily Activity Entry screen is displayed.
6. Click on the Activity Status link to open the desired activity.
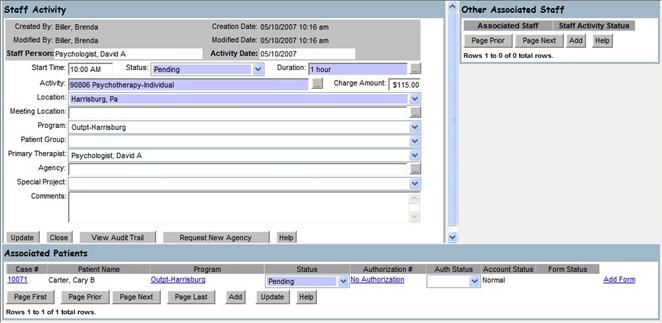
![]() The
Staff Activity window opens. This
displays information about the activity, patients attending, and other staff
that are associated with the activity.
The
Staff Activity window opens. This
displays information about the activity, patients attending, and other staff
that are associated with the activity.
7. If
the link to the right on the Associated Patients frame, says Add Form, a form
has not yet been associated with this activity.
Click on the Add Form link.
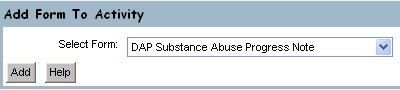
![]() The
Add Form To Activity window opens. This
allows you to select a Form Type from a list of all available.
The
Add Form To Activity window opens. This
allows you to select a Form Type from a list of all available.
8. Enter the desired choice in the Select Form field.
9. Click on the Add button.
10. The
Add Form To Activity window closes and the selected form is displayed.
![]() If
the form has a narrative template associated with it, the Generate Narrative
button is available at the bottom of the form.
If
the form has a narrative template associated with it, the Generate Narrative
button is available at the bottom of the form.
![]() If
the form is a Progress Note, a list of Common Phrases buttons is displayed on
the right of the form. Clicking
on a text field and then clicking on a Common Phrases button will insert the
phrase into the text field. If the text
in the field is selected, clicking on a Common Phrases button will replace the
text. Use the arrow keys on your keyboard
or click on the field a second time to deselect the text prior to clicking on a
Common Phrases button.
If
the form is a Progress Note, a list of Common Phrases buttons is displayed on
the right of the form. Clicking
on a text field and then clicking on a Common Phrases button will insert the
phrase into the text field. If the text
in the field is selected, clicking on a Common Phrases button will replace the
text. Use the arrow keys on your keyboard
or click on the field a second time to deselect the text prior to clicking on a
Common Phrases button.
![]() If
the form is a Multipart Progress Note three panes will be displayed to the left
side of the Common Phrases. See
Multipart Progress Notes for more information.
If
the form is a Multipart Progress Note three panes will be displayed to the left
side of the Common Phrases. See
Multipart Progress Notes for more information.
11. Fill
in the fields on the form and click on the Update button to save your changes
12. Close the
form by clicking on the Close button
or the ![]() button on the upper right of the window.
button on the upper right of the window.
13. The link
to the right of the Associated Client now says View Form. Click
on the View Form link to open the form again.
14. You will
now sign the form. Click on the Sign button.
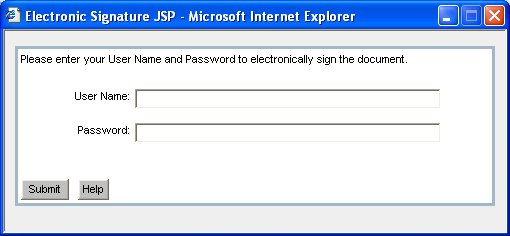
15. Enter your User Name and Password.
16. Click on the Submit button.
![]() If your signature meets the conditions for
required signatures, and it is the last required signature to be added, the
form status will change from Pending to Completed. The status can be seen on the Associated Clients
frame.
If your signature meets the conditions for
required signatures, and it is the last required signature to be added, the
form status will change from Pending to Completed. The status can be seen on the Associated Clients
frame.
17. Close the form
by clicking on the Close button..
18. Close the
Service Activity window by clicking on
the Close button in the Staff
Activity section or the ![]() button on the upper right of the window..
button on the upper right of the window..
Client Management
|
Epitomax allows users to view a client’s electronic
documentation organized by client admission.
When services or activities are entered into Epitomax and forms are
associated with those activities, those forms show up in the client’s
Electronic Record.
Electronic Record
Clinical users can view and/or modify the client’s
electronic record by navigating to the Clinical tab of the client’s admission
episode.
1. Click
on the Case Load menu item from the Clinical menu.

![]() The Case
Load screen is displayed. This is the
view screen for viewing the clients where the logged in user is an Internal
Care Giver. From this screen the user
can easily navigate to the Client Record, Admission, and Add Activity screens
for each client.
The Case
Load screen is displayed. This is the
view screen for viewing the clients where the logged in user is an Internal
Care Giver. From this screen the user
can easily navigate to the Client Record, Admission, and Add Activity screens
for each client.
2. Click
on the Program link for one of the clients.
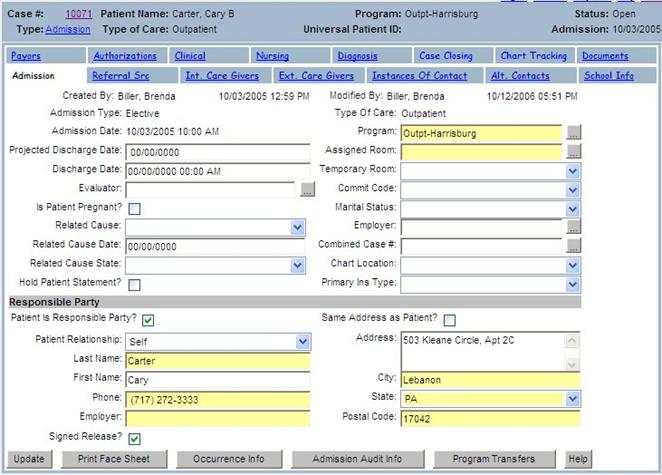
![]() The
Episode screen is displayed. This screen
the view screen for all information pertaining to the open admission..
The
Episode screen is displayed. This screen
the view screen for all information pertaining to the open admission..
3. Click
on the Clinical tab.
![]() The Clinical tab is where the electronic
documentation for the client admission is kept.
The set of tabs under the Clinical tab organize that documentation by
Form Type.
The Clinical tab is where the electronic
documentation for the client admission is kept.
The set of tabs under the Clinical tab organize that documentation by
Form Type.
![]() Progress
Notes (as well as any other form) can be added from here. However, adding a form from one of the tabs
under the Clinical tab will not generate billing. To document a service and generate billing
from that service, see the section on Service Documentation.
Progress
Notes (as well as any other form) can be added from here. However, adding a form from one of the tabs
under the Clinical tab will not generate billing. To document a service and generate billing
from that service, see the section on Service Documentation.
![]() There
could be more forms under the tab than can fit on the screen at one time. Use the Page Next button to see the next page
of forms.
There
could be more forms under the tab than can fit on the screen at one time. Use the Page Next button to see the next page
of forms.
4. Click on the Signatures link next to a form.

![]() The
Signatures List window opens. The lists
all signatures associated with the form.
The
Signatures List window opens. The lists
all signatures associated with the form.
![]() Required
signatures that have been fulfilled have their Role populated in the list. Users that have signed who do not meet the
required signatures criteria for the given form are listed without a Role.
Required
signatures that have been fulfilled have their Role populated in the list. Users that have signed who do not meet the
required signatures criteria for the given form are listed without a Role.
5. Close
the Signatures List window by clicking Close button or the ![]() button on the upper right of the window .
button on the upper right of the window .
6. Click on the Print link next to a form.
![]() Clicking on the Print link opens the
printed version of the form.
Clicking on the Print link opens the
printed version of the form.
7. Close the Print window by clicking on
the ![]() button on the upper right of the window.
button on the upper right of the window.
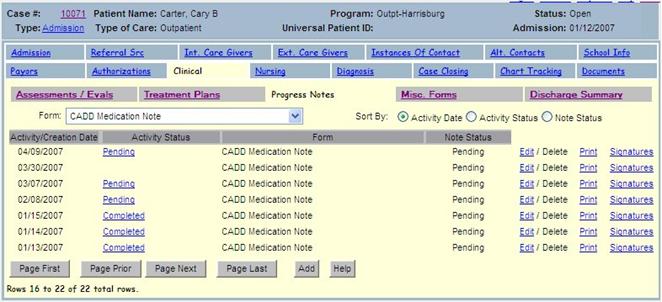
Progress Notes
Forms associated with this client admission with a Form Type
of Progress Note are listed under the Progress Notes tab.
8. The Progress Notes List can be filtered by
Progress Note Form Types that are associated with the Episode, and sorted
according to Activity Date, Activity Status, or Note Status..
9. Click
on the Activity Status link for one of the Progress Notes.
![]() Activities can be viewed and edited from
here.
Activities can be viewed and edited from
here.
10. Close the
activity by clicking on the Close
button in the Staff Activity section or the ![]() button on the upper right of the window.
button on the upper right of the window.
11. Click on the Edit link next to a Progress Note.
![]() Clicking on the Edit link opens the
Progress Note for editing.
Clicking on the Edit link opens the
Progress Note for editing.
![]() Once a Progress Note with a Note Status of
Pending is open for Edit, you have the ability to Update, Sign, Print, and view
the Progress Note History Navigator.
Once a Progress Note with a Note Status of
Pending is open for Edit, you have the ability to Update, Sign, Print, and view
the Progress Note History Navigator.
12. You have
already seen how to Update, and Sign a form.
Click on the History button.
![]() The
Progress Note History Navigator window opens.
This is a filtered, chronological listing of similar Progress Notes
associated with the Episode. Although
primarily intended for reference, all Progress Note Editing functionality,
except the History button, is
available to you from here.
The
Progress Note History Navigator window opens.
This is a filtered, chronological listing of similar Progress Notes
associated with the Episode. Although
primarily intended for reference, all Progress Note Editing functionality,
except the History button, is
available to you from here.
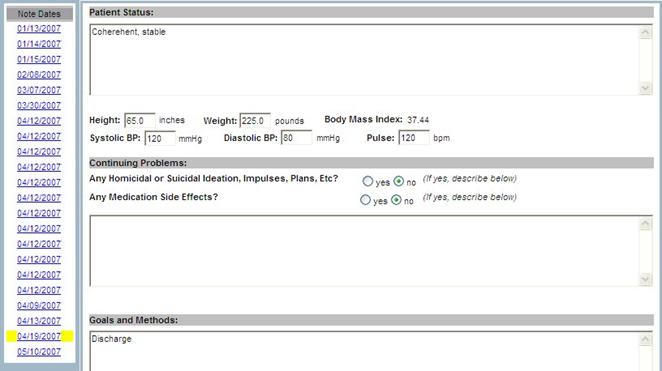
![]() By
default, the Progress Note which is of the same type, and from the activity just
prior to the one that was being edited when the History button was
clicked, will be displayed first when the Progress Note History Navigator is
opened (i.e. In the image above, the Progress Note associated with the activity
that occurred on April 19, 2007 is being displayed. So the Progress Note History Navigator would
have been opened via the History button on the Progress Note associated
with the activity on May 5, 2007).
By
default, the Progress Note which is of the same type, and from the activity just
prior to the one that was being edited when the History button was
clicked, will be displayed first when the Progress Note History Navigator is
opened (i.e. In the image above, the Progress Note associated with the activity
that occurred on April 19, 2007 is being displayed. So the Progress Note History Navigator would
have been opened via the History button on the Progress Note associated
with the activity on May 5, 2007).
13. Close the
Progress Note History Navigatory by clicking on the Close button or the ![]() button on the upper right of the window.
button on the upper right of the window.
14. Close the
form by clicking on the Close button
or the ![]() button on the upper right of the window.
button on the upper right of the window.
15. Close the Progress Note window by clicking
on the Close button or the ![]() button on the upper right of the window.
button on the upper right of the window.
Multipart Progress Notes
Forms associated
with a client admission with a Form Type of Progress Note, and a page name
prefaced by “multipart:” will have all the properties of Progress Notes. The Progress Note window will additionally contain
two additional sections; one for the Summary List and one for the Prescription
Pad.
- Click
on the Edit link for a Progress
Note that has been defined as multipart.
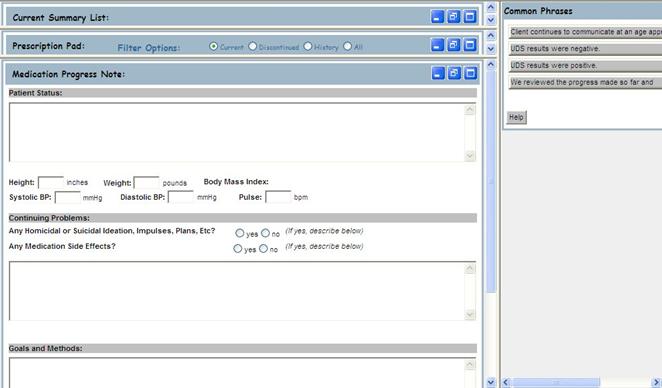
![]() A Multipart Progress Note will
initially open the sections on the left at reduced size. Each section can be minimized, reduced, or
maximized.
A Multipart Progress Note will
initially open the sections on the left at reduced size. Each section can be minimized, reduced, or
maximized.
![]() The top section is the Summary List,
the middle section is the Prescription Pad, and the bottom section is the
Progress Note itself.
The top section is the Summary List,
the middle section is the Prescription Pad, and the bottom section is the
Progress Note itself.
- Click on the Summary List’s
 button to maximize the Summary List
section.
button to maximize the Summary List
section.
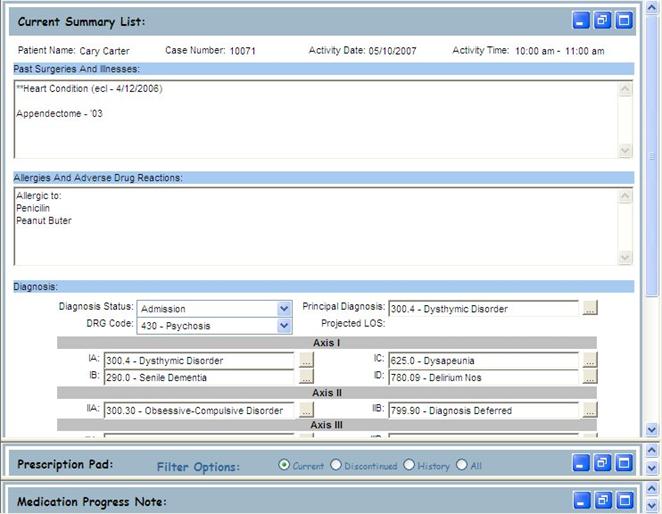
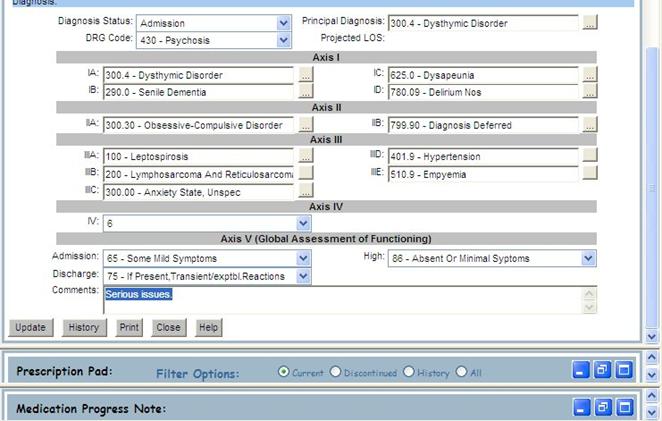
![]() This
view screen displays data, which can also be entered from the Diagnosis Tab on
the Episode, with a header that has information pertaining to the activity, and
fields that have information pertaining to the client’s medical record for the
Episode.
This
view screen displays data, which can also be entered from the Diagnosis Tab on
the Episode, with a header that has information pertaining to the activity, and
fields that have information pertaining to the client’s medical record for the
Episode.
![]() The
other sections of the Progress Note are minimized when the Summary List is
maximized.
The
other sections of the Progress Note are minimized when the Summary List is
maximized.
- Enter new information or modify
existing data. Scroll to the bottom of the Summary List section, and Click the Update button to update the client’s Summary List for this
Episode.
- Click the Print button to open the Print window for the Summary List.
![]() If
the Summary List has been modified and you click Print without first
updating, the Summary List will be updated before the Print window is opened.
If
the Summary List has been modified and you click Print without first
updating, the Summary List will be updated before the Print window is opened.
- Close
the Print window by clicking on the
 button in the upper right corner of the
window.
button in the upper right corner of the
window. - Click
the History button to
generate a Report of modifications made the Summary List associated with
this Episode.
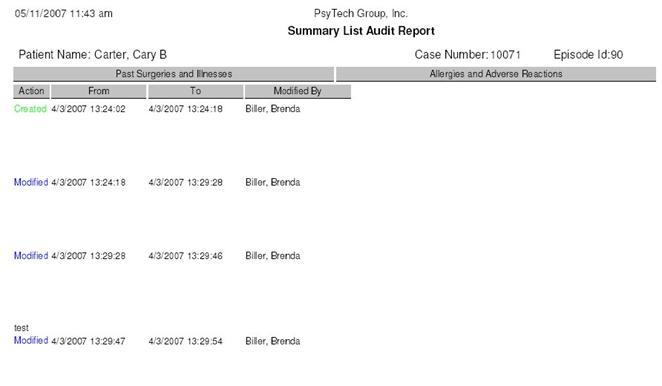
- Close the Summary List Report window by
clicking on the button in the upper right corner of the
window.
- Click
on the Prescription Pad’s button to maximize the Prescription Pad.
![]() The Prescription Pad is a combination of the
Prescription and Medication Tabs from the Client’s record. All functions that can be performed from
either of those tabs (Add Medication/Prescription, Print
Medication/Prescription, Discontinue Medication/Prescription, etc.) can be
performed from this section.
The Prescription Pad is a combination of the
Prescription and Medication Tabs from the Client’s record. All functions that can be performed from
either of those tabs (Add Medication/Prescription, Print
Medication/Prescription, Discontinue Medication/Prescription, etc.) can be
performed from this section.
![]() The number of prescriptions and medications
listed depends on the size of the Prescription Pad section. It will list as many as possible per screen,
with prescriptions first, and in descending order by Prescription Date.
The number of prescriptions and medications
listed depends on the size of the Prescription Pad section. It will list as many as possible per screen,
with prescriptions first, and in descending order by Prescription Date.
![]() Clicking on Print Multiple will only
allow one to print multiple prescriptions, not medications.
Clicking on Print Multiple will only
allow one to print multiple prescriptions, not medications.
![]() The
rows are color coded according to Prescription Date, Rewrite Date, Discontinue
Date, and the current Date. Future
prescriptions are blue, rewritten are green, discontinued are red, and current
are black.
The
rows are color coded according to Prescription Date, Rewrite Date, Discontinue
Date, and the current Date. Future
prescriptions are blue, rewritten are green, discontinued are red, and current
are black.
- Click the Summary List’s
 button to change the sizes of all sections
to reduced.
button to change the sizes of all sections
to reduced. - Close the Multipart Progress Note
window by clicking the button in the upper right corner of the
window, or scrolling to the bottom of the Summary List or Progress Note
sections and clicking the Close button.
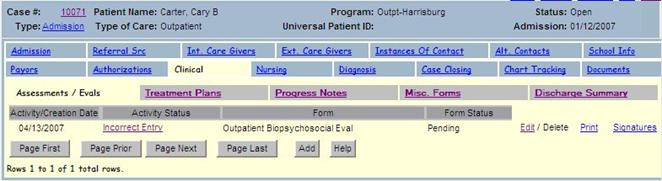
Assessments / Evals
Forms associated with this client admission with a Form Type of
Assessment are listed under the Assessments / Evals tab. The same steps and functionality described
above for Progress Notes is used on the Assessments / Evals tab.
26. Click
on the Assessments / Evals tab.
Treatment Plans
The Treatment Plans tab shows the current or history of
treatment plan forms for the client admission.
27. Click
on the Treatment Plans tab.
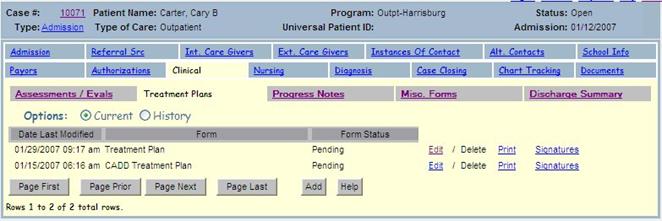
28. Click on the Add button.
![]() If a Treatment Plan already exists for this
client admission, you would not normally create another one.
If a Treatment Plan already exists for this
client admission, you would not normally create another one.

29. Enter the desired form in the Select Form field.
30. Click on the Add button.
31. Click on the Edit link next to the Treatment Plan.
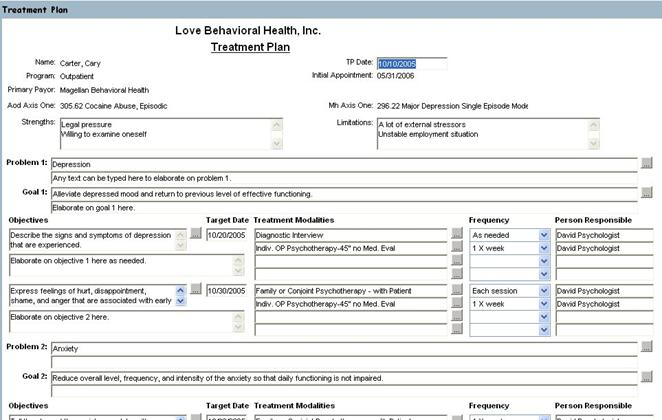
32. Enter some data in the form.
33. Scroll to the bottom of the form.
34. Click on the Update button to save your changes.
35. Close the
form by clicking on the Close button
or the ![]() button on the upper right of the window.
button on the upper right of the window.
36. Click on the Print link next to the Treatment Plan.
37. Close the
print window by clicking on the ![]() button on the upper right of the window.
button on the upper right of the window.
Misc. Forms
Forms associated with this client admission with a Form Type of Miscellaneous
are listed under the Misc. Forms tab.
The same steps and functionality described above for Progress Notes is
used on the Misc. Forms tab.
38. Click
on the Misc. Forms tab.

Discharge Summary
The Discharge Summary tab allows the user to generate a
discharge summary for the client admission in narrative form. Generating the discharge summary involves
selecting a template form or source form, filling in any missing data on the
form, generating the narrative, reviewing the narrative to make any desired
edits, and electronically signing the discharge summary.
39. Click
on the Discharge Summary tab.
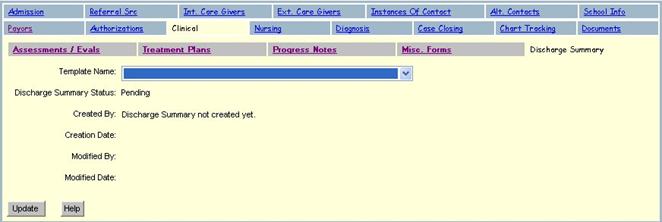
40. Enter a Template Name.
41. Click on the Update button.
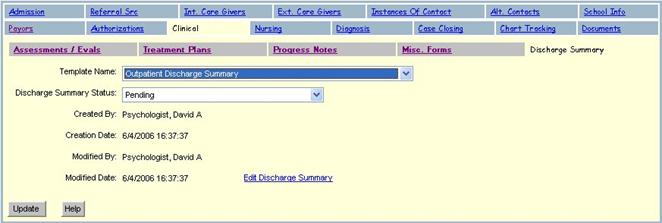
42. Click on the Edit Discharge Summary link.
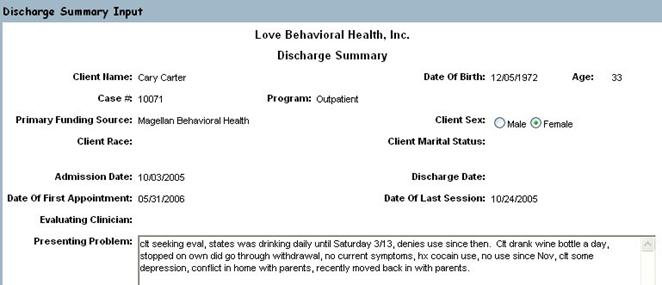
![]() Much of the data on the Discharge Summary
Input form should be populated for you already.
Much of the data on the Discharge Summary
Input form should be populated for you already.
43. Enter any missing data as desired.
44. Scroll to the bottom of the form.
![]()
45. Click on the Update button to save your changes.
46. Scroll to the bottom of the form.
47. Click on the Generate Narrative button.
48. Review the generated text and make any
desired changes.
![]()
49. Click on the Update button to save your changes.
|
|
Clinician Management
|
Epitomax offers tools that enable clinical users to manage
electronic documentation efficiently. In
this section, you will learn about some of those tools.
Clinician Dash Board
The Clinician Dash Board is a place where clinicians who
complete electronic documentation should go frequently. The main section on this screen is the
Documentation Due section in the middle.
This section shows documentation that the logged in user is responsible
for completing including: services with missing documentation, documentation
the user has not yet signed, and documentation requiring an update.
1. Click
on the Clinician Dash Board menu item from the Clinical menu.
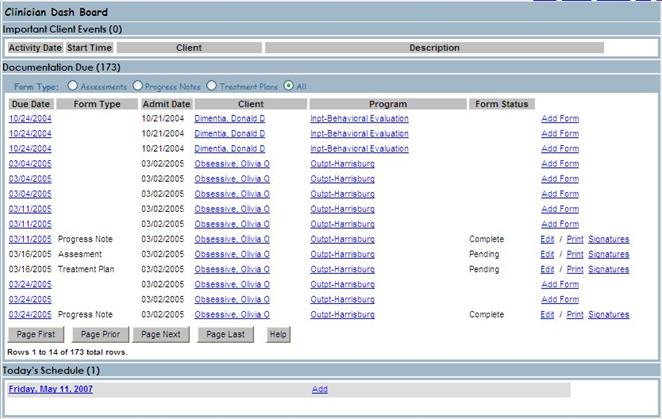
![]() The Clinician Dash Board screen has 3
sections: Important Client Events, Documentation Due, and Today’s Schedule.
The Clinician Dash Board screen has 3
sections: Important Client Events, Documentation Due, and Today’s Schedule.
![]() Sections can be closed and opened up by
clicking on the section heading.
Sections can be closed and opened up by
clicking on the section heading.
![]() Forms can be signed electronically by Editing
and Signing, or by viewing the Signatures List and Adding one..
Forms can be signed electronically by Editing
and Signing, or by viewing the Signatures List and Adding one..
2. Click on the words ‘Important Client Events’ above the top
section. Notice how the section closes
giving more space on the screen for the other sections.
3. Click on the words ‘Documentation Due’ above the middle
section. Now the majority of the screen
is available to display the Today’s Schedule section.
4. Click on the words ‘Documentation Due’ again. Notice how the section opens up again.
5. Click on the Due Date to open the activity.
6. Close the window by clicking on the ![]() button on the upper right corner of the
window.
button on the upper right corner of the
window.
7. Click on one of the Edit links.
8. Close
the form by clicking on the Close
button or the ![]() button on the upper right of the window.
button on the upper right of the window.
Incomplete Documentation Report
The Incomplete Documentation Report shows incomplete
documentation by Clinician or for all clinicians with a given Staff Manager.
1. Click
on the Incomplete Documentation Report menu item from the Clinical menu.
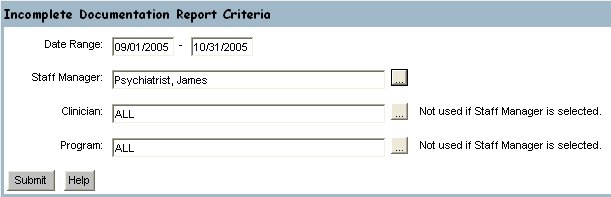
2. Enter
criteria for the report and click on the Submit button.
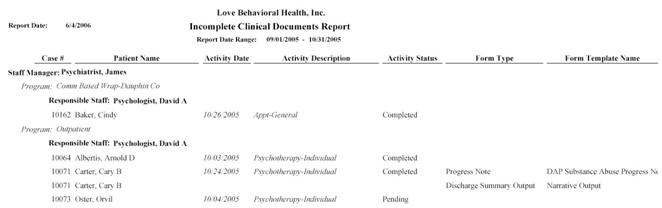
![]() The
Incomplete Documentation Report is generated and displayed for the given
criteria.
The
Incomplete Documentation Report is generated and displayed for the given
criteria.